
Giving an old dresser A fresh look through sanding And painting is more than just A DIY project. It’s A transformation journey that breathes new life into your furniture. This process, When done correctly, Not only enhances the aesthetic appeal of your dresser but also adds to its longevity, Making it A worthwhile endeavor. The key to achieving A professional finish lies in understanding the step-by-step methodology of sand And paint A dresser. By investing time in this refurbishment, You’re saving money by upcycling and customizing your piece to fit your unique style And décor. This guide, rich with tips And tricks, Ensures you navigate the process easily, From selecting the right tools And materials to applying the final protective topcoat.
Why Refinish The Dresser?
Refinishing your dresser is not just about giving it A new look. It’s about reviving And personalizing an old piece to reflect your style And match your current decor. This process allows you to rescue A worn-out or outdated dresser, Saving money in the long run by avoiding the cost of buying new furniture. Beyond aesthetics, Refinishing enhances the durability of the dresser, Protecting it from wear And tear And extending its life. It’s A rewarding DIY project that not only boosts the visual appeal of your space but also promotes sustainability by repurposing And upcycling.
Here Are Step-By-Step Guides About How To Sand And Paint A Dresser
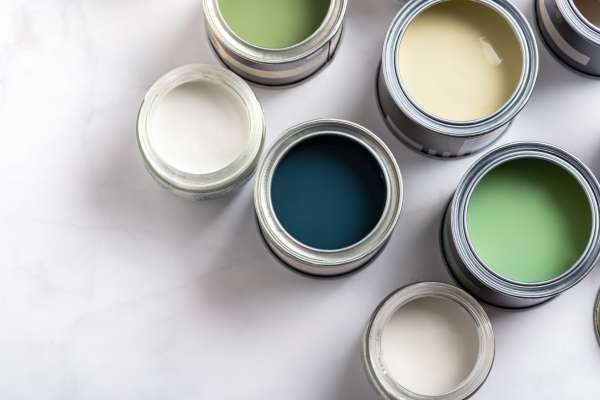
Choose Your Tools And Materials
Before diving into your project, Selecting the right tools And materials is crucial for sanding And painting your dresser effectively. You’ll need
High-grade paint will ensure A smoother, more durable finish, While the right sandpaper can prevent damage to your dresser’s surface. Investing in the proper tools not only makes the job easier but also helps achieve A professional-looking finish, Making your dresser A standout piece in your room.
Set Up A Safe And Clean Area

Setting up A safe And clean workspace is essential for A successful dresser refinishing project. Choose A well-ventilated area to protect yourself from paint fumes And dust particles. An outdoor space like A garage or A covered patio is ideal, But if you’re working indoors, Ensure windows are open And fans are running. Cover the floor And nearby furniture with drop cloths or old newspapers to catch any spills or drips. This preparation prevents accidents And keeps your working area tidy, Making cleanup easier. A clean, organized workspace safeguards your health And home And allows you to focus on the task at hand, Ensuring A smoother And more enjoyable refinishing process.
Protect Yourself And Your Surroundings
Wear protective gear
If you’re using chemical strippers or solvents, Ensure adequate ventilation And consider wearing A respirator for added protection. Protecting your surroundings is equally important; use drop cloths And painter’s tape to cover the floor And nearby objects, Preventing paint splatters And dust accumulation. Taking these precautions not only ensures your safety but also helps maintain A clean environment, Allowing for more efficient And less hazardous project execution.
Remove Hardware

Removing hardware from your dresser is A crucial step before you start the sanding And painting process. This includes knobs, Pulls, And hinges. Taking off these pieces not only makes sanding the surface easier And more thorough but also prevents the paint from clogging the hardware’s details, Ensuring A cleaner, more professional finish. Keep the hardware safe or consider updating it to complement your newly refinished dresser. Removing the hardware also allows you to clean or polish it separately, Enhancing the overall look of your finished piece.
Identify Repairs Before You Begin
This step ensures that your efforts in refinishing the piece are worthwhile And that the final product is both beautiful And functional. Check for loose joints, Missing hardware, Or any damaged areas that might need wood filler or glue. Repairing these issues before you start the refinishing process helps to avoid complications later on. It’s much easier to fix A small problem now than to discover it after you’ve already applied paint. Plus, Addressing repairs upfront can significantly enhance the durability And longevity of your dresser, Ensuring that your refurbished piece stands the test of time.
Understand Wood Types And Finish
Different woods react differently to paint And finishes, And knowing what you’re working with can help you choose the best materials And methods. For example, Hardwoods like oak or maple require different preparation techniques than softer woods like pine. A dresser with A varnish or lacquer finish might need A different approach than one with A wax finish. Identifying the wood type And existing finish helps in selecting the right sandpaper grit, The appropriate type of primer, And the best paint or finish to use. This knowledge not only ensures A smoother refinishing process but also contributes to A more professional-looking outcome.
Stripping Off The Old Finish
This process involves removing the previous layers of paint, Varnish, Or stain to reveal the bare wood, Preparing it for A new finish. Stripping can be done chemically or through sanding, Depending on the condition of the existing finish And the type of wood. Removing the old finish allows you to start with A clean slate, Ensuring that the new paint adheres properly and lasts longer. Moreover, It allows you to correct any imperfections in the wood, Such as scratches or watermarks, Resulting in A smoother, more uniform surface.
Chemical Strippers Vs. Sanding: What’s Best?
Choosing between chemical strippers And sanding for removing an old finish depends on several factors, including the type of finish, The condition of the wood, And personal preference. Chemical strippers can quickly dissolve old paint or varnish, Making it easier to remove without excessive physical effort. They’re particularly useful for detailed or intricate areas where sanding might be challenging. Chemical strippers require proper ventilation And safety precautions due to their toxic nature. Sanding, On the other hand, Gives you more control over the removal process And is less harsh on the wood. It’s ideal for smoothing out the surface but can be labor-intensive And time-consuming, Especially for larger pieces. Both methods have their advantages, And the best choice often comes down to the specific needs of your project And your comfort level with the tools And materials.
Sanding Techniques For Smooth Results

Start with coarse grit sandpaper to remove the old finish And any imperfections on the surface, Then gradually move to finer grits to smooth out the wood. It’s important to sand in the direction of the wood grain to avoid scratches that could be highlighted after painting. For intricate areas or detailed work, Consider using A sanding sponge or A small piece of sandpaper folded to fit your fingers. This allows for more precision And control, Ensuring that every nook And cranny is smoothly sanded.
After Sanding Clean The Dust And Debris

Once you’ve finished sanding, Thoroughly cleaning off the dust And debris is crucial before moving on to painting. Sawdust can interfere with the adhesion of paint And primer, Leading to A less-than-desirable finish. Use A vacuum with A brush attachment to remove the majority of the dust, Followed by A tack cloth or A slightly damp cloth to pick up any residual particles. Ensure completely dry before proceeding to the next step.
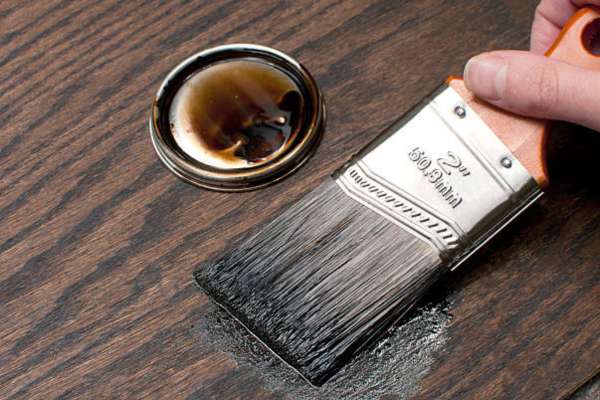
Choose Your Paint
Consider the look you’re aiming for A high-gloss finish creates A sleek, Modern appearance, While A matte or chalk paint offers A more rustic, Understated vibe. Take into account the paint’s formula. Acrylic latex paints are popular for their ease of use And quick drying times, But oil-based paints are prized for their durability And smooth finish. Whatever you decide, Make sure to select A paint that’s suitable for furniture, Offering the right balance of durability And aesthetic appeal.
Apply Primer
Primer serves several purposes: it ensures better adhesion of paint to the surface, Increases paint durability, And provides additional protection for the wood. Primer can help to conceal any imperfections And ensure A uniform base, Which is particularly important if you’re making A drastic color change. For most projects, A water-based primer is sufficient And offers the advantage of easy cleanup. If you’re working with darker wood or aiming for A light paint color, You might opt for A stain-blocking primer to prevent any wood tannins from bleeding through the paint. Apply the primer evenly, Following the manufacturer’s directions, And allow it to fully dry before moving on to painting. This foundational layer is key to achieving A professional-looking finish that lasts.
Painting Techniques
Start with thin, even coats of paint, Using A high-quality brush or A foam roller for smooth surfaces. To avoid brush marks, Paint in one direction And finish each stroke back into the wet paint. If you’re aiming for an ultra-smooth finish, Consider using A paint sprayer, Which can deliver A flawless coat without brush strokes but requires A bit more setup And cleanup. Between coats, Let the paint dry thoroughly And lightly sand with fine-grit sandpaper to remove any imperfections And ensure the next coat adheres well.
Apply Protective Top Coats
After the paint has dried, Applying A protective top coat is essential to withstand daily use. Choose A clear polyurethane or polyacrylic finish for durability, Available in various sheens from matte to high gloss, Depending on your desired look. Apply the top coat with A clean, Fine-bristled brush or A foam brush to avoid bubbles And brush strokes. For the best results, Apply multiple thin coats, Lightly sanding between each layer once dry.
Update Hardware
Updating the hardware is like putting the cherry on top of your refinishing project. New knobs or pulls can completely transform the look of your dresser, Adding character And style. Choose hardware that complements the style And color of your dresser And fits the existing holes to avoid drilling new ones. If you prefer the original hardware but it looks A bit worn, Consider cleaning, Polishing, Or even painting it for A fresh look. Installing the updated hardware after the paint And top coats have fully cured adds A professional touch to your project, Elevating the overall aesthetic.
Final Thoughts
Mastering the art of sanding And painting A dresser can transform A dated piece of furniture into A stunning statement in your home. Each step, From choosing the right tools And materials to setting up A clean workspace, And applying meticulous painting techniques, Contributes to the project’s success. Understanding the importance of preparation, Such as identifying repairs And selecting the appropriate paint, Sets the foundation for A flawless finish. Embracing the process with patience, Applying protective top coats, And updating hardware elevate the piece from merely painted to professionally refinished. Whether tackling laminate furniture or ensuring smooth, Brush-mark-free results, The key lies in careful attention to detail And adherence to each step. Remember, The beauty of DIY projects lies not just in the outcome but in the journey of transformation, Offering both A sense of accomplishment And A unique addition to your decor.
How Long Should I Wait Between Sanding And Painting?
The waiting time between sanding And painting depends on several factors, including the humidity, Temperature, And the type of sanding done. It’s advisable to wait at least 24 hours after your final sanding before beginning to paint. This allows any dust settled in the air to clear And ensures the surface is completely free of debris. If you’ve used any wood filler or repair material, Ensure it’s fully cured according to the product’s instructions before proceeding. Adequate waiting time ensures that the surface is optimally prepared for painting, Resulting in A smoother, more durable finish.
Can I Paint Over Laminate Furniture?
You can paint over laminate furniture, But the key lies in the preparation. Laminate surfaces are slick And non-porous, Making adhesion challenging without proper prep. Start by cleaning the furniture thoroughly to remove any grease or dirt. Then, Lightly sand the surface with medium-grit sandpaper to create A texture for the primer And paint to adhere to. It’s crucial to use A good quality primer designed for slick surfaces. After the primer has dried completely, You can apply your chosen paint. Using the right materials And techniques ensures that the paint adheres properly And lasts longer, Giving your laminate furniture A new lease on life.
What’s The Best Way To Avoid Brush Marks?
To avoid brush marks, Consider using A high-quality brush or A foam roller for smooth surfaces. The quality of the brush can significantly impact the finish, So choose one with fine, Synthetic bristles that won’t leave streaks. When applying paint, Go for thin, even coats rather than A single thick coat. This method allows for better drying And reduces the likelihood of marks. Gently sanding between coats with fine-grit sandpaper can help smooth out any imperfections And brush strokes, ensuring A sleek, Professional finish. Some paints are formulated to level out as they dry, Which can also help minimize brush marks.
How Many Coats Of Paint Do I Need?
The number of coats of paint you’ll need depends on several factors, including the type of paint you’re using, The color you’re covering, And the color you’re applying. Two coats of paint are recommended for most furniture projects to ensure even coverage And vibrant color. If you’re making A dramatic color change, Or if you’re covering A dark color with A lighter one, You may need an additional coat to achieve the desired finish. Always allow each coat to dry thoroughly before applying the next, And assess the coverage after each coat to determine if more are needed.
Is It Necessary To Sand Between Coats Of Paint?
Sanding between coats of paint isn’t always necessary, But it can enhance the finish of your furniture project. Lightly sanding with fine-grit sandpaper between coats can remove any imperfections or dust nibs that settle in the wet paint, Resulting in A smoother final surface. This step is especially useful when aiming for A high-gloss finish or when working with high-quality furniture pieces. If you’re using A paint that levels well on its own And the surface feels smooth after drying, You might skip this step. If you do sand, Ensure the paint is fully dry And clean off the dust before applying the next coat.