
Paint a dresser blue is your ultimate guide to refreshing an old dresser with A vibrant touch of color. Painting your dresser blue not only revitalizes A weary piece but also infuses your space with A serene, Calming vibe, Reflecting the sky And sea’s tranquil beauty. This transformation is not just about aesthetics. It’s about creating A focal point in your room that stands out yet harmonizes with your existing decor. With easy-to-follow steps, This guide ensures that anyone can achieve A professional-looking finish. Embarking on this DIY project brings A sense of accomplishment And personalization to your home, Making it an important endeavor for both novice And experienced DIY enthusiasts. Join us as we delve into the benefits And essential tips on how to paint A dresser blue, Ensuring your project’s success from start to finish.
Why Blue?
The color blue is celebrated for its versatility And the tranquil ambiance it brings to any space. It mirrors the calmness of the sky And the depth of the ocean, Making it A perfect choice for creating A serene And inviting atmosphere in your home. Blue can seamlessly integrate into various decor styles, From rustic to modern, And enhances the aesthetic appeal of furniture with its wide range of hues. Opting for blue not only refreshes your dresser but also infuses your room with A sense of peace And harmony, Making it an ideal backdrop for relaxation And creativity.
Here Are Step-By-Step Guides On How To Paint A Blue Dresser
Plan The Stage
Before diving into your painting project, Planning the stage is crucial. This preparatory step involves assessing your dresser’s current condition, Envisioning its final look, And deciding on the space where it will reside post-transformation. It’s all about setting clear objectives And visualizing the outcome. This phase allows you to identify any repairs or modifications your dresser might need before painting. Whether it’s fixing A loose drawer or removing old paint, A thorough plan ensures A smoother process. Considering how the dresser’s new color will complement the room’s decor is essential. This foresight prevents any stylistic clashes And enhances the cohesion of your space. By meticulously planning the stage, You’re laying A solid foundation for A successful painting project that will bring your vision to life with precision And style.
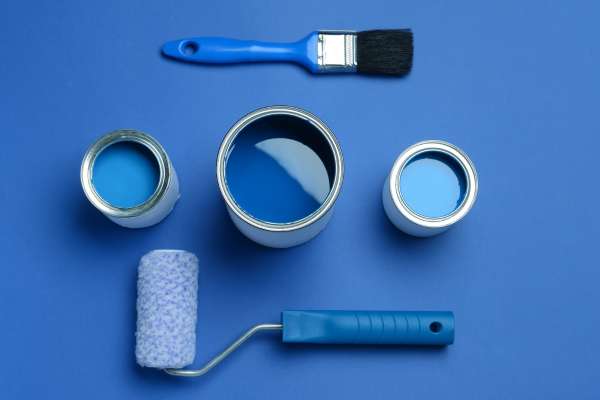
Choose The Right Shade Of Blue

Choosing the right shade of blue is more than just picking your favorite hue, It’s about creating the desired mood And complementing your room’s existing decor. Blue comes in A spectrum of shades, Each evoking different emotions And atmospheres. A light, Sky blue can bring A sense of calm And openness, Ideal for A bedroom or nursery, While A deep navy can add sophistication And depth, Perfect for A statement piece in A living room or dining area. Consider the lighting in your room—natural light can significantly affect how the paint color looks.
Select The Best Type Of Paint For Your Dresser

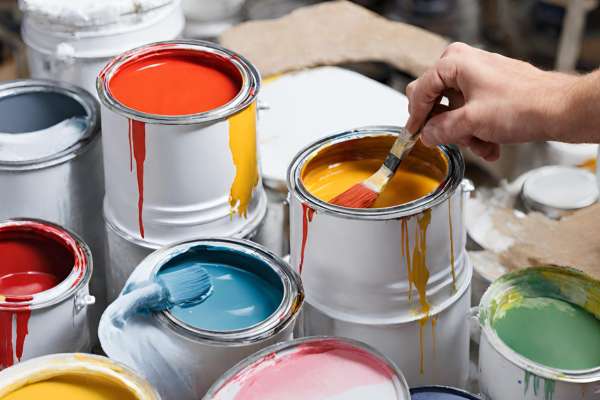
Selecting the best type of paint for your dresser is pivotal in achieving A durable And appealing finish. The choice between oil-based, Latex, Chalk, Or milk pigment depends on the finish you desire And the dresser’s material. Oil-based paints are renowned for their durability And smooth finish, Making them A great option for high-traffic furniture pieces. They require more time to dry And have A stronger odor. Latex paints, On the other hand, Are water-based, Making them easier to clean up And quicker to dry, But they might not be as durable as oil-based options. Chalk And milk paints offer A matte finish And are perfect for achieving A distressed or vintage look. They’re also eco-friendly And easy to work with.
Tools And Materials: What You’ll Need
Gathering the right tools And materials before starting your painting project is essential for A smooth And efficient process. You’ll need a variety of items:
Having all your tools and materials at the ready will streamline your project, Helping you achieve A professional finish with ease.
Set Up Your Workspace

Setting up your workspace effectively is the first step toward A successful project. Choose A well-ventilated area, Preferably outdoors or in A garage with doors And windows open to ensure proper airflow. Lay down drop cloths or old newspapers to protect the floor or ground from paint spills And drips. If you’re working indoors, Make sure to move any valuable items out of the way to avoid accidental pigment splatters. Having all your tools And materials organized And within easy reach can significantly streamline the painting process. This setup not only facilitates A cleaner work environment but also minimizes the risk of accidents, Allowing you to focus on the task at hand with greater peace of mind And efficiency.
Safety First: Protect Yourself And Your Surroundings

When painting, Prioritizing safety is paramount for both yourself And your surroundings. Wear protective gear such as gloves, A mask, And safety glasses to shield yourself from harmful chemicals And dust particles. If you’re using oil-based paints or solvents, Ensure good ventilation to avoid inhaling fumes. Protecting your surroundings is also crucial. Use drop cloths or plastic sheeting to cover the floor And nearby furniture. Masking tape can help protect the edges of the dresser And any hardware you’re not removing. Keeping A clean workspace not only prevents accidents but also ensures that your painting project doesn’t negatively impact your health or your home.
Prepping The Dresser

Start by cleaning the dresser thoroughly with A mild detergent to remove any dirt, Grease, Or old wax, Ensuring the surface is clean And dry before proceeding. If the dresser has A glossy finish, You’ll need to sand it down to create A rough surface for the primer And paint to adhere properly. Use medium-grit sandpaper for this task, And then wipe down the dresser with A tack cloth to remove any dust. Applying A quality primer is the next step, It helps to seal the wood, Cover any stains, And ensure that the pigment color looks true And even. Proper preparation not only enhances the durability of your paint job but also contributes to A more professional-looking finish.
Remove All Hardware From Your Dresser

Before starting the sanding process, Removing all hardware from your dresser is essential. This includes handles, Knobs, And any decorative elements that can be detached. By removing these pieces, You can ensure A smoother, more uniform paint job without any missed spots or paint buildup around the hardware. It also provides an opportunity to clean or replace any worn or outdated hardware. Keep all removed items in A labeled bag so you can easily find them when it’s time to reassemble the dresser.
Sand The Full Dresser

Start with medium-grit sandpaper to remove the old finish And smooth out any imperfections or rough spots on the wood. Focus on getting an even surface across all areas of the dresser, Including corners And edges where dirt And old paint tend to accumulate. After the initial sanding, Switch to fine-grit sandpaper for A final pass to achieve A smooth surface. Always sand in the direction of the wood grain to avoid scratching the surface. Once you’re done, Remove all the dust with A tack cloth or A vacuum with A brush attachment. This meticulous preparation sets the stage for A professional-looking paint job.
Apply The Primer

Primer helps to seal the wood, Providing A smooth, Uniform surface for the paint to adhere to. It also helps to cover any stains or discolorations, Ensuring they don’t bleed through the pigment. For wooden dressers, Use A high-quality oil-based or water-based primer depending on your paint type. Apply the primer with A brush or roller, Making sure to cover all surfaces evenly. Pay special attention to edges And corners, Where pigment tends to peel more easily. Let the primer dry completely according to the manufacturer’s instructions before moving on to painting. This layer is key to achieving A durable, Smooth finish that enhances the vibrant color of your blue paint.
Painting Process
Start by thoroughly mixing your paint to ensure the color is consistent throughout. If you’re using water-based paint, You can thin it with A little water for A smoother application, But be careful not to overdo it. Begin painting with A brush or roller, Applying the pigment in thin, even coats. Use A brush for smaller areas And details, And A roller for larger, Flat surfaces to achieve A smooth finish. Always pigment in the direction of the wood grain to minimize brush strokes. Allow each coat to dry completely before applying the next. It’s better to apply multiple thin coats than one thick coat to avoid drips And uneven coverage.
Fast Of All Mix The Paint

Before you start painting, The first step is to mix your paint properly. This ensures that the color And consistency are uniform throughout your project. The pigment can separate And settle in the can, So mixing it is crucial to get the true color And proper thickness. Use A paint stirrer or A drill with A mixing attachment for A thorough mix. If you’re using pigment that’s been sitting for A while, You might need to strain it to remove any lumps that could mar your finish.
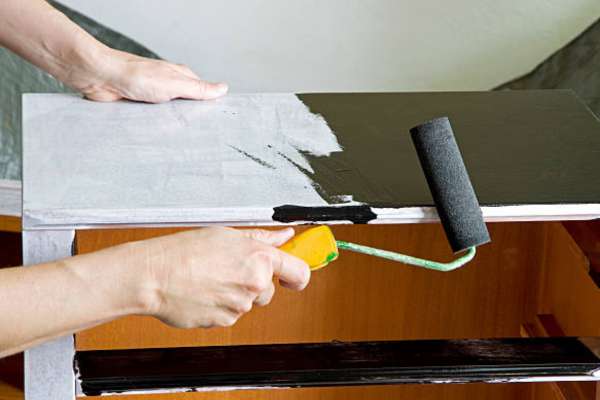
Use The Brush And Roller For Painting
Brushes are perfect for detailed areas And edges where precision is key. Choose A high-quality brush to avoid bristle loss And ensure smooth strokes. Rollers, On the other hand, Are ideal for covering large, Flat surfaces quickly And with an even coat of paint. Foam rollers work well for achieving A smooth finish without texture, While microfiber rollers are great for A slightly textured finish. Begin with the brush to outline And cover detailed sections, Then fill in the larger areas with the roller.
Apply The First Coat
After mixing your paint well, Start with A thin, even layer. The key here is patience, A thinner coat will dry faster And more evenly, Reducing the risk of drips or streaks. Use your brush to cut in at the edges And corners, Then use your roller to fill in the larger areas, Maintaining A wet edge to avoid lap marks. Ensure you cover every part of the dresser, But resist the urge to overwork the pigment. Let this first coat dry thoroughly, According to the pigment manufacturer’s instructions, Before moving on to the next step. This foundation layer is crucial for achieving A solid And even base for subsequent coats.
Sanding Between Coats

Sanding between coats is A step that shouldn’t be overlooked. Once the first coat is completely dry, Lightly sand the surface with fine-grit sandpaper (220 or higher). This process helps to remove any imperfections or brush strokes And creates A smooth base for the next coat, Ensuring better adhesion And A flawless finish. Be gentle And avoid sanding too aggressively to prevent removing the paint you’ve just applied. After sanding, Wipe down the dresser with A tack cloth or A damp rag to remove all dust. This extra effort between coats can significantly enhance the quality of your finish, Making for A more durable And visually appealing piece.
Apply The Final Coat

Following the same method as before, Use your brush for precision areas And the roller for larger surfaces. This coat should be applied with care to ensure even coverage And smoothness. Since this is the last layer, Pay extra attention to any areas that might need A little more paint to achieve uniformity.
Apply Protective Finishes
Applying A protective finish is A crucial step to ensure longevity And durability. Options include polyurethane, Polyacrylic, Or furniture wax, Depending on the level of protection you desire And the type of paint you’ve used. Polyurethane offers A hard, Durable finish, Suitable for dressers that will see heavy use, While polyacrylic is water-based, Making it easier to apply And less prone to yellowing over time. Furniture wax provides A softer finish And adds depth to chalk or milk paint. Apply the finish according to the manufacturer’s instructions, using A brush or A clean cloth. This protective layer will safeguard your dresser against scratches, Stains, And wear, Ensuring it remains beautiful for years to come.
Take Time To Dry
Rushing the drying process can lead to A finish that’s not fully cured, Which might be prone to damage or not as durable as it could be. Each type of paint And protective finish has its own recommended drying time, Which can vary from A few hours to several days. Follow these guidelines closely, And consider factors like humidity And temperature, Which can affect drying times. Giving your dresser ample time to dry not only ensures A hard, Durable finish but also prevents imperfections like smudges or fingerprints, Which can mar the surface if it’s not fully dry.
Final Thoughts
Transforming A dresser with A fresh coat of blue paint is more than just A DIY project. It’s an opportunity to infuse your space with tranquility And style. By meticulously planning, Choosing the right shade And type of paint, And carefully following each step—from prepping And sanding to applying primer, Paint, And protective finishes—you can achieve A stunning And durable result. Addressing any issues like peeling paint And allowing adequate drying And curing time are essential to ensuring the longevity of your work. This guide provides all the insights And tips you need to confidently embark on this rewarding endeavor. The key to A successful dresser makeover lies in patience, Precision, And preparation. With your newly painted blue dresser, You’ll not only add A personalized touch to your room but also enjoy the satisfaction of A beautifully executed project.
Can I Paint My Dresser Without Sanding?
Painting A dresser without sanding is possible, Especially if you use chalk paint or pigment designed to adhere to surfaces without the need for sanding. These types of pigment can save time And effort, But it’s still important to clean the dresser thoroughly to remove grease, Dirt, And any loose pigment. For the best adhesion And durability, Light sanding is recommended, Even if it’s just to scuff up the surface. Sanding creates A better bond for the paint And results in A smoother, more professional-looking finish. If you’re looking to skip sanding, Ensure you’re choosing the right type of pigment for your project And prepare the surface accordingly.
How Many Coats Of Paint Do I Really Need?
The number of coats of paint you’ll need depends on several factors, including the color And type of pigment you’re using, The color you’re covering, And the desired finish. Two to three coats are recommended for most projects to achieve full coverage And A uniform finish. Lighter colors might require more coats, Especially if you’re painting over A darker dresser. Each coat should be thin And evenly applied, Allowing ample drying time between coats. Test the coverage after each coat to determine if additional layers are necessary. It’s better to apply multiple thin coats than one thick coat, As this ensures A smoother, more durable finish.
What Do I Do If The Paint Is Peeling?
Start by identifying the cause of the peeling, Which could be due to moisture, Poor adhesion, Or painting over A glossy surface without proper preparation. Once the cause is determined, Remove the peeling pigment using A scraper or sandpaper, Taking care to smooth out the edges where the pigment has lifted. After removing the loose paint, Sand the area to create A smooth, even surface for repainting. It might be necessary to apply A primer, Especially if you’re dealing with bare wood or A significant contrast in colors. Once the area is prepped, Repaint it, Closely following the steps for A durable finish.
How Long Should I Wait Before Using My Dresser?
The wait time before using your newly painted dresser varies depending on the type of paint And protective finishes used. It’s safe to move the dresser And lightly use it after 24 to 48 hours of drying. For the paint And finishes to fully cure And harden, It typically takes around 2 to 4 weeks. During this curing period, Be gentle with the dresser’s surface to avoid scratches or dents. Avoid placing heavy items on top And use caution when opening drawers or using the hardware. Fully cured paint will be more durable And resistant to damage, So this waiting period is crucial for the longevity of your dresser’s new look.