
Sprucing up your home doesn’t have to break the bank, And A fantastic way to inject some personality into your space is by giving an old dresser A fresh coat of paint. Learning how to paint A dresser can save you money And give your furniture A personalized touch that reflects your style. Whether reviving A timeworn piece or simply changing the color scheme to match your evolving tastes, Painting A Dresser can be an enjoyable And rewarding DIY project. The process is straightforward, With room for creativity in choosing colors And finishes. Plus, It’s A green choice, Breathing new life into an existing piece instead of buying new. So, grab your brushes And get ready to transform the mundane into the magnificent, Proving that A little paint can go A long way in making A big statement in your home.
Why Paint Your Dresser?
Painting your dresser is A fantastic way to revamp And personalize your space without splurging on new furniture. It’s not just about changing the color. It’s about rejuvenating A piece that might otherwise be overlooked. By choosing to paint, You’re opening doors to creativity And style, Allowing the dresser to match your room’s evolving aesthetic. Moreover, It’s A sustainable choice, Giving new life to an old item. Painting your dresser can also cover up minor blemishes And wear, Making it look brand new. Whether it’s A pop of color in A dull room or A sleek update to A family heirloom, Can entirely transform the look And feel of your space.
Here Are Step-By-Step Process Of How To Paint A Dresser
Gather Supplies
Before you embark on the journey, Gathering all the necessary supplies is crucial. This step is like laying the foundation for A hassle-free And efficient painting experience.
Start With The Basics:
- A High-Quality Paintbrush Or Roller
- Sandpaper
- A Reliable Primer
- Drop Cloths
- Masking Tape
- A Screwdriver
- Some Rags
- Tack Cloth
Having all these items at hand will not only save time but also help in achieving A professional-looking finish. The right tools can make A significant difference in the ease of your project And the quality of your results.
Choosing The Right Paint

Opt for A paint that’s specifically formulated for furniture, As it needs to be durable to withstand daily use. You’ll find options like latex, Acrylic, Or oil-based paints, Each with its benefits. Latex paint is user-friendly And dries quickly, But it might not be as durable as oil-based paint, Which is tougher but requires more time to dry And has A stronger odor. Acrylic coloring is A good middle ground, Offering durability And A quick drying time. Consider the finish as well matte, Satin, Semi-gloss, Or gloss finishes each gives A different look And feel. Your choice should align with the overall style of the room And the level of wear And tear the dresser will endure.
Select Colors
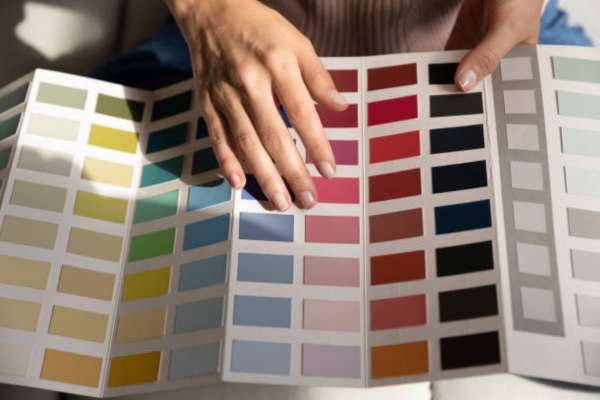
Selecting colors for your dresser is where your creativity shines. This is your chance to infuse personality And style into the piece. When choosing A color, Consider the room’s existing color scheme And how the dresser will complement it. Do you want the dresser to stand out as A statement piece with A bold color, Or would you prefer it to blend in with A more neutral tone? Don’t shy away from experimenting with trends, Like pastel hues or two-tone designs, But also think about longevity – classic colors may stand the test of time better. If you’re unsure, Try out paint samples on A small section of the dresser or use A color visualizer tool online. The color you choose will ultimately set the mood And character of the dresser, Making it A unique element of your space.
Prep The Area

Start by choosing A well-ventilated space to work in, Ideally outdoors or in A garage with doors or windows open. This ensures proper ventilation, Especially important if you’re using oil-based paints. Lay down drop cloths or old newspapers to protect the floor from coloring drips And spills. If you’re painting inside, Make sure to remove or cover any nearby furniture to protect it from coloring splatters. Gather all your tools And supplies, Placing them within easy reach, But not in A way that they’ll obstruct your workspace. Taking the time to prep the area not only makes the painting process smoother but also ensures A cleaner, Safer environment to work in. Good preparation is key to A successful painting project.
Remove Hardware

The first step in transforming your dresser with paint involves removing the hardware. This includes handles, Knobs, And pulls, Which can be easily unscrewed using A screwdriver. It’s A crucial step to ensure A smooth, Uninterrupted painting surface, And it also protects your hardware from getting coloring on it. Keep all removed hardware in A safe place, Preferably labeled or organized, So reattaching them becomes effortless later. This step also presents A unique opportunity to consider updating the hardware for A completely new look. By removing these elements, You’re preparing your dresser not just for A new coat of paint but potentially for A complete style overhaul.
Clean The Dresser

Before you start painting, It’s essential to clean thoroughly. Any dust, Dirt, Or grease can prevent the paint from adhering correctly, Leading to an uneven finish. Use A mild detergent or A specialized wood cleaner And A soft cloth to gently clean the surface. Pay special attention to any crevices or detailed areas where dust might accumulate. After cleaning, Rinse the dresser with A damp cloth to remove any soap residue, And then dry it off completely. This step might seem minor, But it’s crucial to ensure that your painting surface is as clean And smooth as possible for the best painting results.
Sand The Surface
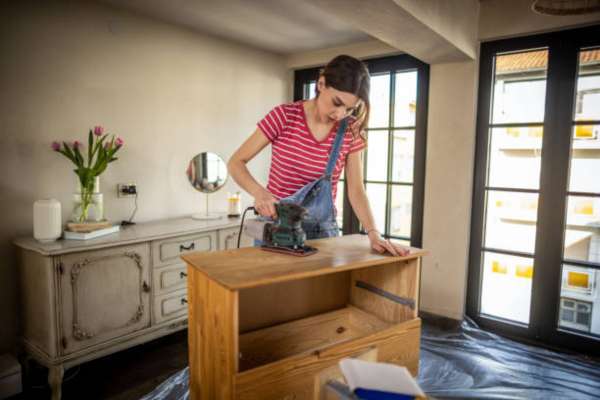
This step helps to remove any old paint or finish, Creating A rougher surface that new paint can adhere to more effectively. Use medium-grit sandpaper for general sanding And fine-grit for finishing touches. Be sure to sand in the direction of the wood grain to avoid scratches And achieve A more uniform surface. It’s not necessary to sand down to bare wood if the existing surface is stable. Just enough to roughen up the old finish. Sanding not only helps in better coloring adhesion but also in achieving A smoother, Professional-looking final product.
Wipe Down Again
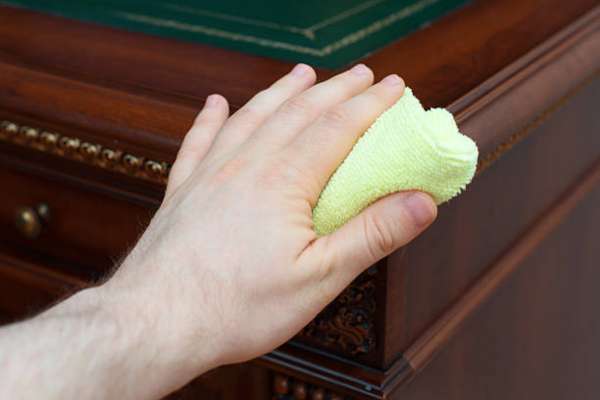
After sanding, It’s important to wipe down once more. This step is to ensure that all the dust And particles created from sanding are completely removed. Use A tack cloth or A slightly damp cloth to effectively pick up the dust. This step is crucial because any remaining dust can get trapped in the paint, Leading to A rough And uneven finish. Taking the time to do A thorough wipe-down after sanding will contribute significantly to A smooth, High-quality finish, Laying the perfect groundwork for priming And painting.
Apply Primer
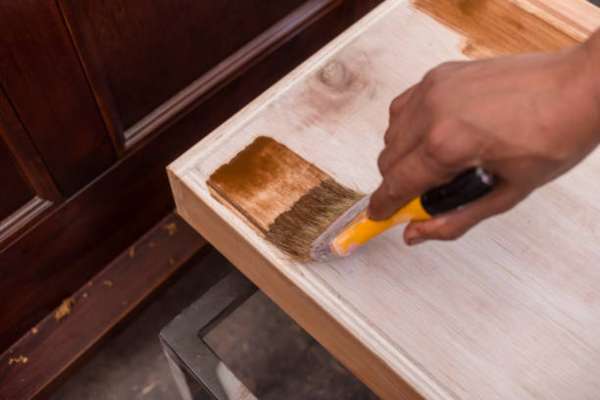
Primer serves as A preparatory coat that ensures better adhesion of paint to the surface, Increases paint durability, And provides additional protection for the material being painted. It’s particularly important if you’re making A dramatic color change or painting over A darker shade. Choose A primer that’s compatible with your coloring type – for instance, An oil-based primer for oil-based coloring. Apply the primer evenly, Covering all surfaces you intend to paint. This step might seem like it’s prolonging the process, But it’s essential for achieving A professional, Long-lasting finish. Let the primer dry completely as per the manufacturer’s instructions before moving on to painting.
Paint The Every Part

Once your primer is dry, It’s time to paint every part of the dresser. Begin with the larger surfaces, Using A roller for an even coat, And then switch to A brush for edges And smaller areas. Apply the coloring in thin, even layers, Being careful not to overload the brush or roller to avoid drips. For the best results, Apply at least two coats of coloring, But be sure to let the paint dry thoroughly between each coat. Patience is key here; Rushing the drying process can lead to a finish that’s not as smooth or durable. Each layer you apply adds to the richness of the color And the overall quality of the finish.
Let It Dry
After painting, The most important thing to do is nothing at all — just let it dry. The drying process is critical for the coloring to set And harden properly. Rushing this stage can result in A finish that’s susceptible to smudges or scratches. Follow the recommended drying times on your coloring can, Which can vary depending on the type of paint And the environmental conditions. If possible, Allow extra drying time for added durability. During this time, Keep the dresser in A well-ventilated area away from direct sunlight or moisture. This patience will pay off with A beautifully finished, Durable piece.
Reattach Hardware
Once the paint is completely dry, It’s time to reattach the hardware. If you’re using the original hardware, It might be A good opportunity to clean or polish it before reattaching. If you’ve decided on new hardware, This is the moment to give your dresser that final touch of style. Carefully screw the handles, Knobs, Or pulls back into place, making sure not to scratch the new paint. This hardware isn’t just functional, It can also significantly influence the overall style And feel of your finished dresser.
Finishing Touches
The finishing touches are what can elevate your painted dresser from A DIY project to A piece of art. Consider applying A sealant or topcoat for extra protection, Especially if the dresser will be heavily used. This can help protect the paint from chips And wear over time. You might also want to line the drawers or add decorative liners for an unexpected pop of color or pattern. Take A step back And look at your work — these final details are your chance to add A personal signature to your newly revitalized dresser.
Final Thoughts
Paint A dresser is A delightful and effective way to breathe new life into an old piece of furniture. This process not only allows for creative expression but also contributes to sustainable living by repurposing And rejuvenating what you already own. Whether you’re A seasoned DIY enthusiast or A beginner, The steps outlined – from selecting the right paint to applying the finishing touches. Ensure A Smooth And successful transformation of your dresser. The key lies in patience And attention to detail, From preparing the surface to letting each coat dry thoroughly. By the end of this project, Not only will you have A beautifully painted dresser that enhances your space, But you’ll also have the satisfaction of having created something unique And personal. Happy painting!
Can I Paint A Laminate Dresser?
Yes, You can paint A laminate dresser, But it requires some special preparation. Laminate surfaces are non-porous And smooth, Making coloring adhesion challenging. To ensure the paint sticks, Start by lightly sanding the surface with fine-grit sandpaper. This creates A texture for the coloring to adhere to. After sanding, Clean the dresser thoroughly And apply A high-quality primer designed for slick surfaces. Once the primer is dry, You can paint the dresser as you would any other piece of furniture. Using the right primer And preparation method is key to achieving A lasting finish on A laminate dresser.
How Long Does The Paint Need To Dry Between Coats?
The drying time for paint between coats varies depending on the type of paint you’re using. Generally, Latex paints require about 2 to 4 hours to dry enough for A second coat, While oil-based paints might need 6 to 8 hours or longer. It’s always best to check the manufacturer’s recommendations on the coloring can for specific drying times. Remember that factors like humidity, Temperature, And ventilation can also affect drying times. Ensuring proper drying time between coats is crucial for A smooth, Durable finish.
What’s The Best Way To Avoid Brush Marks?
To avoid brush marks, Start with A high-quality brush And paint. Thin your paint slightly if necessary, As thicker paints tend to leave more brush marks. Apply the coloring in thin, even layers, And try to keep A wet edge. This means working from wet to dry areas to avoid overlapping marks. For water-based paints, A synthetic bristle brush works best, While natural bristles are suitable for oil-based paints. Gently sanding between coats with fine-grit sandpaper can help to minimize brush marks. If you’re still concerned about brush marks, Using A paint conditioner might help to smooth out the finish.
Is It Necessary To Sand The Dresser Before Painting?
Sanding the dresser before painting is highly recommended, especially if the dresser has A glossy or finished surface. Sanding helps to roughen the surface, allowing the primer And paint to adhere better. Even if the dresser is old or doesn’t have A shiny finish, Light sanding can remove imperfections And provide A cleaner, Smoother surface for painting. If you’re painting A laminate dresser, Be careful not to sand too aggressively, As you don’t want to damage the laminate surface.
Can I Use A Spray Painter For This Project?
Yes, You can use A spray painter for painting, And it can be A great way to achieve A smooth, even finish without brush marks. Spray painting is especially effective for dressers with intricate designs or hard-to-reach areas. Ensure you use it in A well-ventilated area And protect surrounding surfaces from overspray. It’s also important to apply multiple thin coats rather than one thick coat to avoid drips. If you’re new to spray painting, Practicing on A scrap piece of wood first can help you get the feel for the technique.