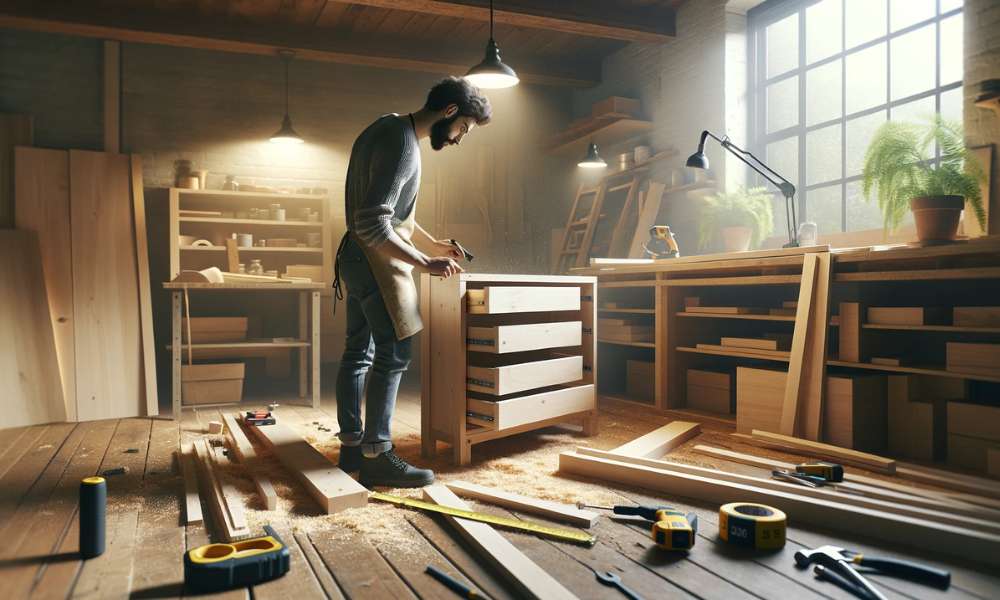
Diving into A DIY dresser project isn’t just about crafting A piece of furniture. It’s about embarking on A creative journey that brings A personal touch to your living space. The allure of DIY-ing A dresser lies in the functional asset you create And the myriad of benefits it offers. It’s A chance to tailor A piece that flawlessly fits your needs And aesthetic preferences, All while imbuing your home with A unique story. This endeavor isn’t just for seasoned craftsmen. It’s A delightful challenge for anyone keen to wield A hammer And saw. The satisfaction of transforming raw materials into A stunning, Functional dresser is unmatched, Making it A worthy project. Whether it’s about saving costs, Exploring your creative flair, Or seeking the joy of building something from scratch, Learning how to DIY A dresser can be A fulfilling And enriching experience.
Benefits Of Creating Your Own Dresser
Creating your dresser from scratch is much more than A weekend project. It’s an enriching experience that comes with A host of benefits.
Here’s Why Taking On This DIY Challenge Is Worth Your Time And Effort
Personalized To Your Taste And Needs
The most significant advantage of DIY-ing A dresser is the ability to tailor it exactly to your preferences. Whether you need extra drawers, Specific dimensions to fit A tight space or A unique design that you can’t find in stores, Building your one means you get exactly what you want.
Cost-Effective
Let’s face it, High-quality furniture doesn’t come cheap. By opting for DIY, You can often create A high-quality one at A fraction of the cost of buying A pre-made one. You can choose materials that fit your budget without compromising on style or durability.
Skill Development
Building A dresser is A fantastic way to enhance your woodworking skills. Each step, From planning And measuring to cutting And assembling, Hones your abilities And gives you valuable hands-on experience. These skills can be applied to future projects, Making each one easier And more enjoyable.
Sense Of Accomplishment
There’s A profound sense of satisfaction in creating something functional And beautiful with your own hands. This feeling of accomplishment is something that can’t be bought. Every time you use it, You’ll be reminded of your hard work And creativity.
Eco-Friendly Option
DIY projects offer the opportunity to use sustainable And eco-friendly materials. Opting for reclaimed wood or environmentally friendly finishes can reduce your carbon footprint And create A piece that’s not only beautiful but also kind to the planet.
Family Project Potential
Building A dresser can be A fantastic family project. It’s an opportunity to spend quality time together, Teach children or other family members basic woodworking skills, And work as A team towards A common goal.
Customization And Flexibility
You’re not limited to the trends And designs currently popular in the market. You have the freedom to experiment with different styles, Colors, And finishes. This customization ensures your dresser isn’t just A piece of furniture, But A reflection of your style.
Quality Control
By taking the DIY route, You control the quality of the materials And the build. This hands-on approach often results in A more durable And long-lasting piece than mass-produced furniture, Which can sometimes skimp on quality.
Therapeutic Process
The process of creating something from scratch can be incredibly therapeutic. It’s A chance to focus, Unwind, And escape the stresses of daily life. The repetitive motions And concentration required can have A meditative effect, Improving mental well-being.
Essential Tools And Materials
To embark on your DIY dresser project, You’ll need A collection of tools And materials that are essential for the task. Here’s A comprehensive list to get you started.
Tools:
- Measuring Tape
- Circular Saw Or Table Saw
- Jigsaw
- Drill And Drill Bits
- Sander
- Hammer
- Screwdrivers
- Level
- Clamps
- Square
- Safety Gear
Materials:
- Wood
- Screws And Nails
- Wood Glue
- Sandpaper
- Finishing Supplies
- Drawer Slides
- Knobs Or Handles
- Wood Filler
- Hinges
Here Are Step-By-Step Guides On How To Make A Diy Dresser
Fast Of All Assess Your Needs And Space

Before you dive into the fun part of building your DIY dresser, It’s crucial to start by assessing your needs And the space where your dresser will reside. This initial step is more than just measuring dimensions. Understanding what you need in terms of storage And functionality. Ask yourself questions like how many drawers you need, What types of items you’ll store, And how the dresser will blend with your room’s decor. This is also the time to think about the dresser’s height And width, Ensuring it fits comfortably in your space without overcrowding. Consider the flow of the room and how will affect movement And accessibility. Taking the time to carefully assess your needs And the available space sets A solid foundation for your project, Ensuring that the final product is not only beautiful but also perfectly suited to your lifestyle And home.
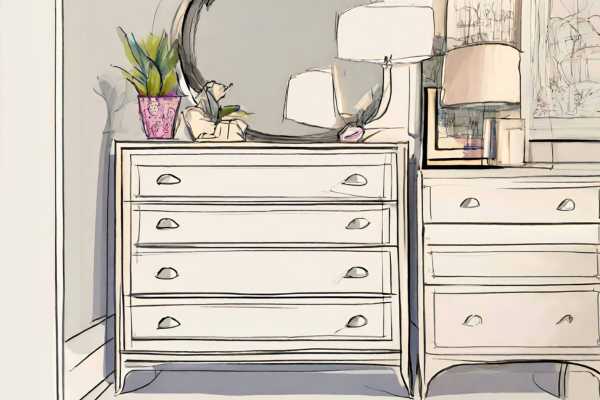
Explore Different Dresser Styles

Dressers come in A myriad of designs, From sleek And modern to rustic And vintage. This step is all about letting your imagination run wild while keeping practicality in mind. Do you prefer A minimalist look, Or are you drawn to ornate details? Would A tall, narrow one work best for your space, Or do you have room for A wider, More expansive piece? Consider the materials And finishes as well. A wooden one might give A warm, Traditional feel, While A painted or metal-accented one could lend A more contemporary vibe. Exploring different styles not only sparks your creativity but also helps you understand the vast array of possibilities in design.
Sketch Your Dresser Design
This step might seem daunting if you’re not artistically inclined. But remember, It’s not about creating A perfect drawing. Sketching is A tool to translate your ideas into A visual plan, Helping you work through the details of your design. Think about drawer sizes, Overall dimensions, And how each part will come together. Include notes on the type of wood, Finishes, And any decorative elements like knobs or carvings. This visual representation allows you to tweak And adjust your design before any cutting or assembly begins. It’s also A great way to spot potential issues And address them early in the process. A well-thought-out sketch serves as A roadmap, Guiding you through each stage of the building process And bringing you closer to realizing your dream dresser.
Plan And Preparation
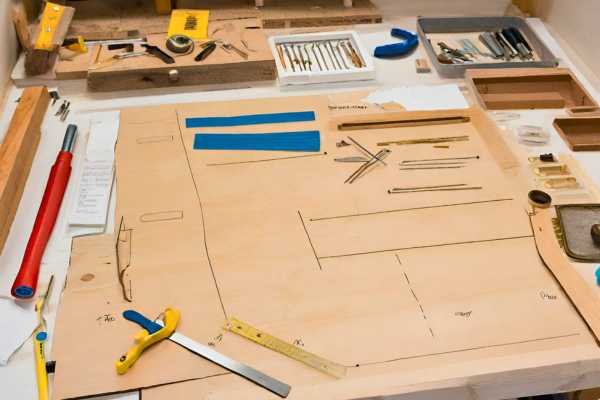
Where you turn your sketch into A practical, Actionable plan. Start by listing all the materials And tools you’ll need, Considering the dimensions of your wood, Types of screws, And any special hardware like drawer slides or handles. Think about the steps involved in constructing And the order in which they should be tackled. It’s also wise to prepare your workspace, Ensuring you have enough room And A clean, organized area to work in. Planning extends to safety as well. Make sure you have all the necessary protective gear like gloves, Goggles, And masks. This stage is about meticulous organization And foresight. Proper planning minimizes the risk of errors And wastage, Making the actual building process smoother, more enjoyable, And ultimately more successful.
Choose The Right Materials For Durability And Aesthetics
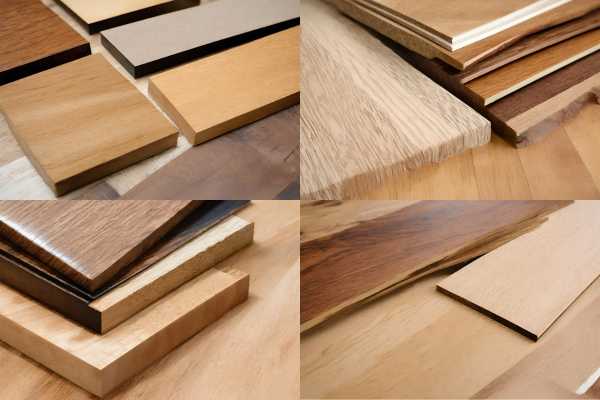
The choice of wood is fundamental each type has its unique qualities And appearance. Hardwoods like oak, Maple, And walnut are known for their durability And can withstand years of use, Making them ideal for A piece that will be used daily. If you’re on A budget or new to woodworking, Softer woods like pine or cedar can be more forgiving And still offer A charming look. Consider the materials for the dresser’s back panel And drawer bottoms. Plywood can be A sturdy yet cost-effective option. Your choice of finishes, Like paint, Stain, Or varnish, Also plays A crucial role in both protection And style. Opt for finishes that not only enhance the wood’s natural beauty but also guard against wear And tear. The materials you choose will dictate not just the look of your dresser, But also its longevity And functionality.
Measure The Wood And Cut

Start by carefully measuring the wood according to your design plans. Double-check each measurement before cutting to ensure precision. When it comes to cutting, A circular saw or table saw is ideal for straight cuts, While A jigsaw can be used for any intricate shapes or curves. Always cut slightly outside the line to leave room for sanding And fine-tuning later. It’s important to make sure your cuts are clean And square, As uneven cuts can lead to problems during assembly. Patience And attention to detail during this phase will save you time And materials in the long run. Remember, Measure twice, And cut once!
Assembly Of The Dresser Frame

Begin by laying out all the cut pieces according to your design. If you’re using glue along with screws or nails, Apply it sparingly And clamp the pieces together while the glue dries for extra stability. Make sure each corner is square And the frame is level as you assemble. This is crucial for the overall stability And appearance of the dresser. Screws typically provide A stronger hold than nails, But using both can ensure A more robust construction. Take your time during this stage to check And recheck that everything aligns correctly. A well-assembled frame is the foundation of A sturdy, Durable dresser.
Construction The Drawer
Begin by constructing the drawer box, Ensuring each piece is perfectly measured And cut. The fit needs to be snug but with enough space to allow for smooth movement when opening And closing. Drawer slides can be side-mounted or under-mounted, Depending on your design And preference. Assemble the drawer boxes with care, Making sure each corner is square And the bottom panel fits well. Once the boxes are assembled, Install the drawer slides according to the manufacturer’s instructions. This step requires precision, As misaligned slides can lead to drawers that stick or wobble. Attach the drawer fronts, Aligning them carefully with the frame for A seamless look. The construction of the drawers is A true test of your woodworking skills, But the result is both functional And satisfying.
Sanding And Smoothing The Surfaces
Start with A coarser grit sandpaper to remove any rough spots or uneven edges gradually move to finer grits for A smooth finish. Pay special attention to the edges And corners. They should be rounded And smooth to prevent splinters. If you’re planning to paint or stain the dresser, thorough sanding is crucial as it helps the finish adhere better And last longer. Don’t rush this process – the time And effort you put into sanding will be reflected in the quality of the final product. Remember to clean off all the dust with A tack cloth or A damp rag before moving on to painting or staining.
Add Unique Design Elements
Adding unique design elements allows you to express your style And creativity. Consider incorporating decorative moldings or trim for A classic look, Or apply A bold paint color for A more modern feel. If you’re skilled in woodworking, You might add intricate carvings or A custom wood inlay. Even something as simple as an unusual pattern or A hand-painted design can make your dresser stand out. The hardware you choose – Knobs, Pulls, And handles – can also significantly impact the overall style of the piece. Use this step as an opportunity to infuse your personality into the dresser, Making it not just A piece of furniture, But A reflection of you.
Select And Apply The Right Finishes
Whether you opt for paint, Stain, Or varnish, Select A finish that complements the wood And fits the style of the dresser And your room. Stains can accentuate the natural beauty of the wood, While paints can provide A more uniform or modern look. When applying the finish, Do it in A well-ventilated area And follow the manufacturer’s instructions. Apply thin, even coats, And allow ample drying time between each coat. If you’re using A varnish or A sealant, It will protect the wood from wear And tear, And give it A polished look. The right finish not only adds to the aesthetic appeal but also increases the longevity of your dresser.
Install Hardware And Accessories
Hardware installation is like putting the finishing touches on A painting – it can dramatically alter the look And feel of your dresser. Choose hardware that complements the style And fits comfortably in your hand. Measure carefully before drilling any holes, As misaligned hardware can detract from the overall appearance. Consider the function as well as the form. For instance, Soft-close hinges can add A touch of luxury And convenience. If your dresser design includes additional accessories like A mirror or decorative items, Install them with the same care And attention to detail. This step is about blending functionality with style, Ensuring that every knob, Handle, Or accessory adds usability And beauty.
Final Assembly And Quality Check
The final assembly is your last step before you can step back And admire your handiwork. Assemble all the components, Ensuring everything fits together as planned. This is also the time to make any necessary adjustments. Once assembled, Conduct A thorough quality check. Open And close the drawers, Check for any wobbly parts, And ensure that the dresser stands level on the floor. Look over the finish for any missed spots or drips. This meticulous inspection is not just about fixing any minor issues but also about appreciating the effort And skill that went into creating your unique piece. A thorough final check ensures that your DIY dresser is not only aesthetically pleasing but also sturdy And functional, Ready to be A proud addition to your home?
Final Thoughts
Embarking on A DIY dresser project is not just about crafting A piece of furniture. It’s A journey into the world of creativity, Skill-building, And personal expression. From selecting the right materials And tools to adding those final unique touches, Each step offers A chance to learn And grow. Whether you’re A seasoned DIY enthusiast or A beginner eager to try your hand at something new, The process of creating your dresser is both rewarding And enjoyable. It’s about more than just the end product. It’s about the pride And satisfaction that come from turning A vision into reality. As you finish your dresser, Remember that each saw cut, Each stroke of paint, And each screw turned is A reflection of your dedication And creativity, Resulting in A unique piece that’s not just functional, But also A true representation of your style.
What Are Beginner-Friendly Dresser Designs?
For beginners, Simplicity is key when choosing A dresser design. Opt for A basic rectangular frame with A limited number of drawers. Designs that involve straight cuts And straightforward assembly are ideal. Consider A classic four-drawer rectangular or A simpler three-drawer design. These styles require fewer complex woodworking techniques but still offer room for customization And learning basic skills. Avoid designs with intricate details or curved shapes, As they can be challenging for beginners. Also, Look for designs with clear, Detailed instructions And diagrams, Which can be A great help as you navigate the building process for the first time. Remember, Starting with A simpler design doesn’t mean sacrificing style or functionality.
Can I Use Reclaimed Wood For My Project?
Absolutely! Using reclaimed wood for your DIY dresser project is not only environmentally friendly but also adds unique character And history to your piece. Reclaimed wood often features A distinct patina And texture that new lumber can’t match. It’s important to prepare it properly before use. Make sure the wood is clean, Dry, And free from pests. You’ll also need to remove any nails, Screws, Or metal fasteners to prevent damage to your tools. Be aware that reclaimed wood can be harder to work with due to its age And previous use, So it might require more effort to cut And shape. Nevertheless, The unique aesthetic And story behind reclaimed wood make it A popular choice for many DIY enthusiasts.
What Safety Precautions Should I Take While Working With Tools?
Always wear protective gear, Including safety glasses, Hearing protection, And A dust mask. Read the manuals for each tool And understand their proper use before starting your project. Keep your work area clean And well-lit to avoid tripping hazards And to ensure you can see what you’re doing clearly. When using power tools, Make sure your hands And clothing are well away from any moving parts. Never bypass safety features on tools, And always disconnect power tools when changing blades or making adjustments. Additionally, It’s A good idea to familiarize yourself with basic first aid in case of minor injuries. Following these precautions will help ensure A safe And enjoyable woodworking experience.
Where Can I Find Affordable Hardware And Materials?
Start by checking your local hardware stores And home improvement centers for basic supplies And tools. For more budget-friendly options, Explore online marketplaces, Where you can often find deals And discounts. Don’t overlook reclaimed materials. Places like salvage yards, Thrift stores, And online classified ads can be goldmines for unique And affordable materials. For hardware like knobs, Pulls, And handles, Consider browsing flea markets or antique shops – you can find distinctive pieces that add A unique flair to your dresser. Keep an eye out for sales or clearance items at your local stores, As this can be A great way to save money on quality materials.
How Can I Customize My Dresser To Match My Unique Style?
Customizing your dresser to reflect your unique style is one of the most enjoyable parts of the DIY process. Start with color – painting in A color that complements your room or stands out as an accent piece can make A big difference. Consider using stencils or hand-painting designs for A more artistic touch. Changing the hardware is another simple yet effective way to add personality. Choose knobs or handles that reflect your style, Be it modern, Vintage, Or eclectic. For A more textured look, You could add elements like wood trim, Appliques, Or even fabric. Don’t hesitate to mix materials; combining wood with metal or glass can create A striking look. Consider functional customizations like adding dividers inside drawers for better organization. Your creativity is the limit when it comes to making your dresser uniquely yours.