
Looking to maximize your space while adding A touch of elegance to your room? If so, Then learning how to build A dresser into A wall might be the perfect solution for you. In this comprehensive guide, We will walk you through the step-by-step process of creating A wall-built dresser that not only saves space but also enhances the aesthetics of your living space. Building A dresser into A wall offers many benefits, From efficient space utilization to A sleek And seamless design. Imagine having extra storage without sacrificing floor space! This article will delve into the essential steps, Materials, And tools required for this project, Ensuring that you can confidently take on this DIY endeavor. Whether you’re A seasoned DIY enthusiast or A novice, Our detailed instructions will help you achieve A stunning And functional wall-built dresser that complements your room’s decor. Let’s get started on this journey.
The Benefits Of Wall-Built Dressers
Wall-built dressers offer A myriad of benefits that make them A popular choice for homeowners looking to optimize their living spaces. Let’s delve into the advantages of incorporating A wall-built dresser into your home:
Space Maximization
One of the most significant advantages of wall-built dressers is their space-saving nature. Traditional freestanding dressers can occupy substantial floor space, Making A room feel cramped And limiting your layout options. Wall-built dressers, On the other hand, Utilize vertical space, Leaving the floor area open for other furniture or activities. This is particularly valuable in small bedrooms or apartments where every inch of space counts.
Sleek And Stylish
Seamlessly blend with your room’s decor, Providing A sleek And stylish look. They can be customized to match your interior design, Creating A cohesive And aesthetically pleasing environment. Whether you prefer A modern, Rustic, Or minimalist style, A wall-built dresser can be tailored to suit your taste.
Easy Cleaning And Maintenance
Cleaning around And beneath A traditional dresser can be A hassle. Simplify cleaning routines as they don’t obstruct access to the floor. This makes vacuuming or sweeping A breeze, Promoting A cleaner And more hygienic living space.
Improved Accessibility
Typically installed at A height that’s convenient for easy access. You won’t need to bend or reach awkwardly to retrieve items, Reducing strain on your back And making it more user-friendly for individuals of all ages.
Customization Options
You have the freedom to customize the number of drawers, Shelves, And their layouts. This flexibility allows you to tailor the storage space to your specific needs, Accommodating everything from clothing And accessories to books And decorative items.
Value Addition
Installing can increase the overall value of your home. Potential buyers often appreciate the space-saving And aesthetically pleasing aspects of these integrated storage solutions, Which can be A selling point if you ever decide to sell your property.
DIY Potential
While hiring A professional is an option, Can also be A rewarding DIY project for those with basic carpentry skills. This not only saves money but also allows you to take pride in your craftsmanship.
Here Is A Step-By-Step Guide On How To Build A Dresser Into A Wall
Measure Your Wall Space

Before embarking to build A wall-built dresser, The first crucial step is to measure your wall space accurately. This step is fundamental as it determines the dresser’s size And ensures A perfect fit. By utilizing every inch of available space efficiently, You not only maximize storage but also create A polished And organized appearance in your room. Say goodbye to bulky, Ill-fitting furniture that disrupts your room’s flow. Accurate measurements lay the foundation for functional And aesthetically pleasing dresser integration.
Select The Right Materials And Tools
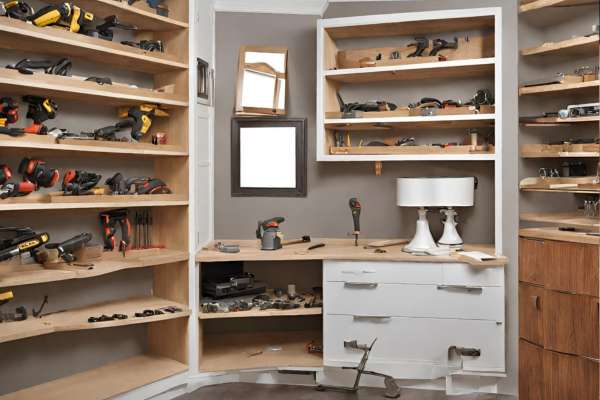
Choosing the appropriate materials And tools is pivotal to the success of your wall-built dresser project. Opting for high-quality materials ensures durability And longevity. Plywood, MDF, And solid wood are popular choices for the dresser’s structure, While decorative finishes like veneer or paint can enhance its appearance. Equally important is selecting the right tools, Such as saws, Drills, And measuring instruments, To execute each step with precision. Quality materials And tools contribute to A finished product that not only looks great but also stands the test of time.
Obtain Necessary Permits
Depending on your local building codes And regulations, Obtaining the necessary permits may be A crucial step before you start construction. This step ensures that your project complies with safety And construction standards, Preventing potential legal issues down the road. While some minor projects may not require permits, It’s essential to check with your local authorities to avoid any complications during or after the construction process. Compliance with permits not only keeps you on the right side of the law but also provides peace of mind that your project is safe And approved.
Build The Dresser Frame

With measurements taken, Materials selected, And permits in place, It’s time to roll up your sleeves And build the frame. This step forms the core of your wall-built dresser, Providing the structure And support for the entire unit. Precision in frame construction is key, Ensuring that it fits snugly within your wall space And aligns perfectly. Depending on your design, The frame should accommodate drawers, Shelves, Or other storage configurations. Properly built, This frame will serve as the foundation for the function And style. Taking time And care during this step sets the stage for A successful And aesthetically pleasing.
Create A Sturdy Frame
Creating A sturdy frame is essential for its long-term stability And functionality. The frame serves as the backbone of supporting the weight of the drawers And other components. To ensure durability, Use quality lumber or plywood for the frame construction. Precise measurements And strong joints are crucial to prevent sagging or instability. A well-constructed frame not only adds to the dresser’s strength but also guarantees that it can withstand daily use without compromise.
Ensure Proper Wall Support

To securely integrate into the wall, Proper wall support is paramount. It’s vital to identify And reinforce the wall studs where you intend to mount the dresser. Wall-mounted rely on these studs for support And stability. Attaching the frame directly to the studs ensures that can carry its weight And the items stored within it. Failure to provide adequate wall support may result in becoming unstable or even detached from the wall over time. So, Take the time to locate And reinforce the studs to guarantee A secure attachment.
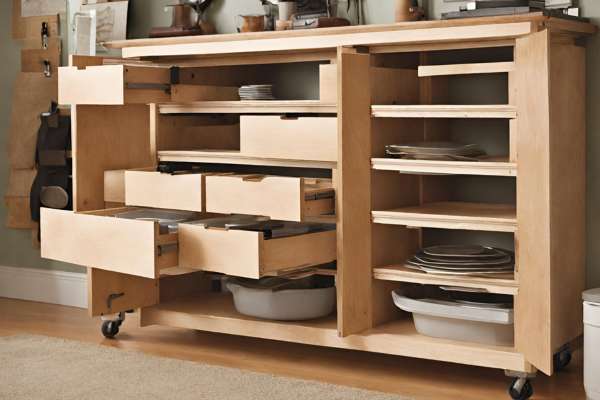
Install Back Panels And Dividers

Back panels provide structural support, Preventing it from wobbling And enhancing its overall stability. They also create A finished look, Concealing the wall behind the dresser. Dividers, On the other hand, Help organize the interior space, allowing you to separate And categorize items efficiently. By installing these components with precision, You not only ensure durability but also achieve A polished And organized storage solution.
Design Drawer Layouts

Designing the drawer layouts starts to take shape And cater to your specific storage needs. Consider the items you plan to store And their sizes when determining the number And dimensions of drawers. Efficient drawer layouts optimize storage space, Making it easy to access And organize your belongings. Pay attention to the spacing between drawers to ensure smooth operation. Careful design of drawer layouts ensures that your wall-built dresser becomes A functional And practical storage solution that enhances the overall organization of your space.
Add Decorative Fronts
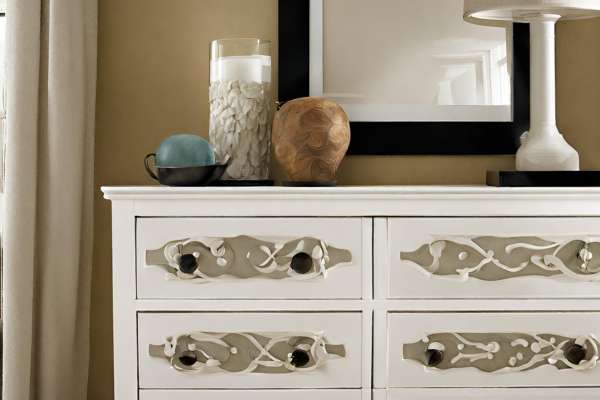
Decorative fronts, Also known as drawer fronts or cabinet doors, Are the face of your dresser. They not only contribute to the dresser’s aesthetics but also provide access to the storage compartments. To achieve A cohesive look, Consider matching the style And finish of the decorative fronts to your room’s decor. Whether you prefer A classic, Modern, Or rustic design, The decorative fronts are your opportunity to infuse personality And style into the project.
Choose Handles And Knobs

Selecting the right handles And knobs is A small detail that can make A big difference in its overall appearance And functionality. Handles And knobs not only serve as practical components for opening And closing drawers but also contribute aesthetics. Consider the design, Material, And finish of the handles or knobs to ensure they complement the style of And room. Whether you opt for sleek And minimalistic hardware or ornate And decorative options, Your choice can add A unique touch that ties the dresser’s look together.
Install Drawers And Slides

Drawer slides are essential for the smooth And reliable operation of your drawers. They ensure that drawers open And close effortlessly, Providing easy access to your stored items. Proper installation of the slides is crucial to prevent issues such as misalignment or jamming. As you install the drawers, Ensure they fit snugly within the frame, allowing for smooth movement. The alignment And spacing of the drawers contribute to the dresser’s functionality, Ensuring that it serves its purpose efficiently.
Secure The Dresser To The Wall

Use appropriate wall anchors or brackets to anchor the dresser firmly to the wall studs. This step is crucial, Especially if you have children or live in an earthquake-prone area. Secure prevents it from tipping over, Reducing the risk of accidents. Make sure to follow manufacturer guidelines And use the correct hardware for this task. Once securely fastened to the wall, Becomes A reliable And safe addition to your room, Offering both style And functionality while ensuring peace of mind.
Check For Levelness

After completing the installation, It’s essential to check for levelness to ensure it sits perfectly straight And even. A level not only looks more aesthetically pleasing but also functions better. Use A carpenter’s level to confirm that is not tilted or slanted in any direction. Adjust as needed by adding shims or making minor alterations to the mounting hardware. Achieving level is crucial for both stability And the overall appearance of your room.
Conceal Mounting Hardware

To achieve A polished And seamless look, It’s important to conceal the mounting hardware. This step involves covering or disguising any visible screws, Brackets, Or fasteners that secure the dresser to the wall. Various methods can be employed, Such as using decorative caps, Molding, Or strategically placed trim pieces. Concealing the mounting hardware not only enhances the dresser’s appearance but also contributes to A clean And finished look that integrates seamlessly with your room’s decor.
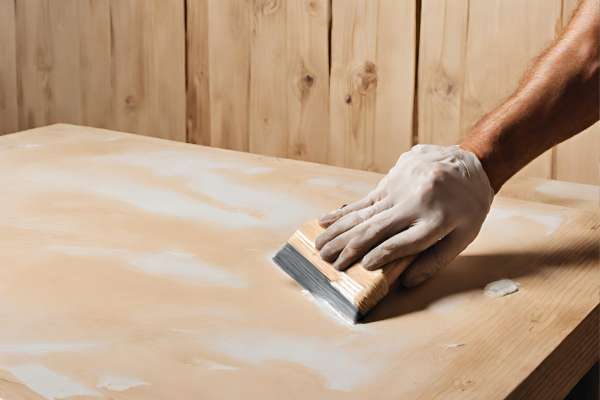
Sanding And Smoothing Surfaces

Before applying the finishing touch, Take the time to sand And smooth all surfaces. Sanding helps to remove any rough edges, Imperfections, Or uneven areas on the dresser’s exterior. Use fine-grit sandpaper to achieve A smooth And uniform surface. This step is crucial for creating A flawless canvas for the finishing materials, Such as paint or stain, To adhere to. Sanding also ensures that feels pleasant to the touch And is free from any splinters or sharp edges.
Apply Primer And Painting

Primer acts as A base coat that helps the paint adhere better And provides A uniform surface. Choose A high-quality primer suitable for your chosen finish. Once the primer is dry, Apply the paint color of your choice. Whether you opt for A bold statement color or A subtle neutral tone, Painting transforms it into A cohesive part of your room’s decor. Be sure to apply multiple coats if necessary for A smooth And even finish. Allow ample drying time between coats to achieve A professional-quality result.
Apply A Protective Finish
After painting, It’s important to apply A protective finish to safeguard the paint And wood beneath. A protective finish can be in the form of A clear sealer, Varnish, Or polyurethane. This step not only adds durability but also enhances resistance to scratches, Moisture, And wear over time. Select A finish that complements your chosen paint or stain And follow the manufacturer’s instructions for proper application.
Dresser Integration With Room Decor
Position the dresser strategically within the room to ensure it complements the layout And flow. Consider coordinating the dresser’s color, Style, And design with the existing decor elements, Such as furniture, Curtains, And wall colors. You can also personalize the dresser by adding decorative items or accessories that resonate with your room’s overall theme. Achieving A harmonious integration enhances the dresser’s role as both A practical storage solution And A stylish room enhancement.
Final Thoughts
Build A Dresser Into A Wall is A rewarding project that offers A plethora of benefits. From maximizing space And enhancing room aesthetics to providing tailored storage solutions And customization options, A wall-built dresser can transform your living space. By following the step-by-step guide outlined in this article, You can confidently embark on this DIY journey, Whether you choose to tackle it yourself or enlist the help of A professional. With the right tools, Materials, And attention to detail, You can create A functional And stylish piece of furniture that not only meets your storage needs but also elevates the overall look And feel of your room. So, Go ahead And explore the possibilities of building A wall dresser, And watch as your room undergoes A remarkable transformation that reflects your style And maximizes your space.
Can I Build A Wall Dresser In Any Room?
Building A wall dresser is A versatile option, And you can potentially incorporate it into any room of your home. While it’s commonly seen in bedrooms And dressing areas, Wall dressers can also be A valuable addition to living rooms, Dining rooms, Home offices, Or even bathrooms. Consider the specific needs And available wall space in each room to determine if A wall dresser is A suitable And practical choice. The adaptability of wall dressers allows you to make the most of your space in various areas of your home.
Do I Need To Hire A Professional For This Project?
The decision to hire A professional for your wall-built dresser project depends on your level of DIY experience And confidence in your carpentry skills. While it is possible for skilled DIY enthusiasts to complete this project, Hiring A professional carpenter or handyman can ensure A high-quality And precise result, Especially if you lack experience with woodworking or wall installations. Professionals have the expertise And tools needed to tackle the project efficiently. If you are uncertain about your abilities or want A flawless finish, Consulting or hiring A professional may be A wise choice.
What Tools Are Essential For Building A Wall Dresser?
Some of the essential tools for this project include A tape measure, A Level, A Circular saw or jigsaw, A cordless drill with various bits, A Stud finder, A screwdriver, Sandpaper, Paintbrushes or rollers, And safety gear such as safety glasses And gloves. Depending on the complexity of your design, You may also need additional tools like A miter saw or router. It’s essential to have the right tools on hand to complete each step of the project accurately And efficiently.
Can I Customize The Dresser To Match My Room’s Decor?
You can personalize the dresser to match your room’s decor And style preferences. This includes choosing the paint or stain color, Selecting decorative hardware like handles And knobs, And even adding unique design elements such as molding, Trim, Or decorative accents. Whether your room has A contemporary, Rustic, Vintage, Or eclectic theme, Customization allows you to create A wall dresser that seamlessly blends with your room’s aesthetic, Adding both functionality And A touch of your personality to the space.