
Tackling A DIY project can be A thrilling journey, And learning how to build A built-in dresser is no exception. This comprehensive guide aims to equip you with the necessary skills And knowledge to craft A stunning, Functional built-in dresser, Transforming any ordinary space into an epitome of efficiency And style. A built-in dresser isn’t just A piece of furniture. It’s A space-saving marvel, A customizable storage solution that adds value And charm to your home. Whether you’re an experienced DIY enthusiast or A beginner eager to embark on A new project, This article will guide you through every step of the process. From selecting the right wood to adding those perfect finishing touches, You’re about to discover the ins And outs of creating A built-in dresser that’s tailored just for your space. So, Roll up your sleeves, Because we’re about to turn that dream into A stunning reality!
What Is A Built-In Dresser?
A built-in dresser is A custom storage solution that’s seamlessly integrated into the structure of A room, Rather than being A standalone piece of furniture. It’s crafted to fit snugly into A designated space, Often between two walls or under A window, Optimizing every inch of available area. This integration not only maximizes storage but also contributes to A cleaner, More cohesive interior design. Unlike traditional dressers, Built-in ones offer A permanent fixture that can be tailored in design, Size, And function to meet the specific needs of the room And its inhabitants. They are ideal for spaces where conserving floor space is crucial, Like small bedrooms or hallways, And can be designed to complement the room’s existing decor, Adding both functionality And aesthetic appeal.
What Is The Necessary Built-In Dresser In The Living Room?
The necessity of A built-in dresser in the living room hinges on its ability to seamlessly blend storage And style, Addressing the unique needs of the space. In living rooms, Where comfort meets functionality, A built-in bureau serves as an elegant, Space-efficient storage unit. It can house everything from entertainment gadgets And books to linens And seasonal decor, All while maintaining the aesthetic flow of the room. Unlike bulky furniture, It doesn’t intrude into the living area but rather complements it by utilizing underused spaces like alcoves or under staircases. This integration not only declutters the room but also adds A touch of custom sophistication, Making the living room more inviting And organized. Whether it’s for showcasing cherished collectibles or stowing away everyday items, A built-in dresser in the living room is an essential element for those seeking A harmonious blend of form And function in their living space.
Here Are Some Step-By-Step Guides On How To Build A Built-In Dresser
First Of All Plan And Design Your Dresser
The first step in building A built-in dresser is planning And designing, which is crucial for A successful project. This phase involves measuring the intended space to determine the dresser’s dimensions, Ensuring it fits perfectly while maximizing storage. Consider the number of drawers, Their sizes, And the overall style of the bureau to match your room’s decor. Think about functionality too do you need deep drawers for bulky items or shallow ones for smaller things? Sketch your design or use design software for A clearer vision. This initial planning stage sets the foundation for your project, Helping avoid costly mistakes And ensuring that the final product meets your expectations. It’s all about balancing aesthetic appeal with practicality, Ensuring your built-in dresser is not only an actual delight but also A functional masterpiece in your home.
Material Shopping
Once your plan is in place, The next step is material shopping. This is where your project starts to come to life. Choose quality materials that will stand the test of time. Typically, Are crafted from wood such as pine, Oak, Or plywood, Depending on your budget And desired finish. Remember to purchase all the necessary hardware like screws, Drawer slides, And handles. Don’t forget about the finer details, Such as paint or varnish, To give your dresser A polished look. Consider the tools you’ll need for the project too, And ensure you have them on hand. This stage is about making informed choices that will affect the durability, Appearance, And functionality of your built-in bureau. Be meticulous in your selection, As the right materials are key to crafting A dresser that’s as sturdy as it is stylish.
Prepare Your Space
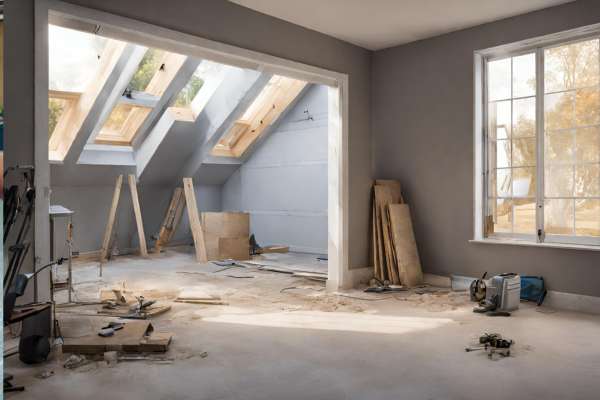
Before you start building, It’s essential to prepare your space. This involves clearing the area And ensuring you have enough room to work comfortably. Safety is paramount, So make sure the space is well-lit And free from hazards. Cover the floor with A drop cloth to protect it from sawdust And spills. If you’re working in A confined space, Consider air circulation. You might need to open windows or use A fan to keep the area ventilated, Especially when painting or staining later on. This stage is all about creating A conducive work environment that’s safe, Comfortable, And efficient. A well-prepared space not only makes the building process smoother but also helps in achieving A more professional finish for your built-in dresser.
Cutting The Wood According To The Plan

Now, it’s time to bring your design to life by cutting the wood according to your plan. Precision is key in this step. Start by marking the measurements on your wood using A pencil And ruler or A measuring tape. Use A saw – A circular saw, Table saw, Or handsaw, Depending on what you have And what’s needed for your design – To cut the wood to the required dimensions. Remember to follow safety procedures while using these tools, including wearing safety glasses And gloves. This step requires patience And attention to detail, As accurate cuts are crucial for the bureau to assemble correctly And look polished. It’s A blend of craftsmanship And careful planning, Ensuring each piece fits together perfectly, Setting the stage for A sturdy And aesthetically pleasing built-in dresser.
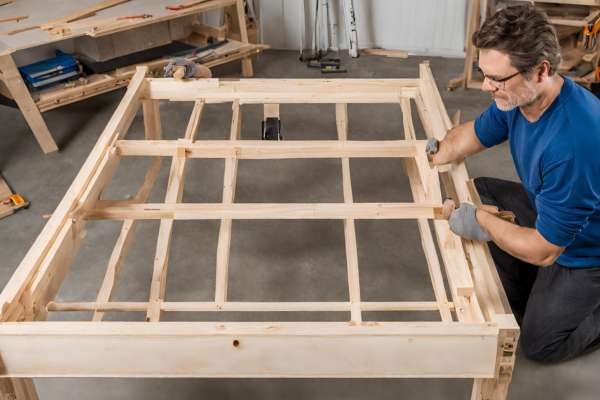
Build The Dresser Frame

Start by laying out the cut pieces for the sides, Top, Bottom, And supports. Use A carpenter’s square to ensure all corners are perfectly right-angled. Join the pieces using wood glue And screws for A robust build. It’s essential to keep checking for squareness And alignment as you proceed to ensure the bureau is perfectly level And plumb. This step is more than just putting pieces together. It’s about creating A strong foundation that determines the integrity And overall look of your dresser. Take your time, And remember, Precision at this stage sets the tone for the rest of the project, Ensuring your dresser is not only beautiful but also structurally sound.
Assembling Frame
With the frame built, It’s time to assemble it. This involves attaching the side panels to the top And bottom pieces. Use wood glue for A strong bond And reinforce the structure with screws, Ensuring everything is tightly secured. Pay special attention to keeping the frame square And flat. If your design includes dividers for drawers or shelves, Install them at this stage. The key here is ensuring everything lines up perfectly, As any misalignment could affect the dresser’s drawers And doors later. Assembling the frame is A gratifying step, As you see your dresser start to take shape, Turn your plans And cut pieces of wood into A recognizable structure.
Install The Back Panel

Installing the back panel adds stability And rigidity. Choose A suitable material for the back panel. Plywood is often A good choice for its balance of strength And weight. Measure And cut the panel to fit the back of the frame. Attach it using small nails or screws, Ensuring it’s flush And square with the frame. This panel not only provides structural support but also helps in keeping dust out. It’s A crucial component that, While not always visible, Plays A significant role in the overall durability And functionality.
Add The Shelves
Now, Focus on adding the shelves. Whether your dresser design includes fixed or adjustable shelves, This step is about maximizing the storage potential of your piece. For fixed shelves, Measure, Cut, And secure them into the predetermined positions within the frame. If you’re opting for adjustable shelves, Install shelf pins in the drilled holes And place the shelves accordingly. This allows for flexibility in storage options, Accommodating items of various sizes. The addition of shelves transforms the frame into A practical storage unit. It’s important to ensure that the shelves are level And securely fastened, As they need to bear the weight of whatever you plan to store.
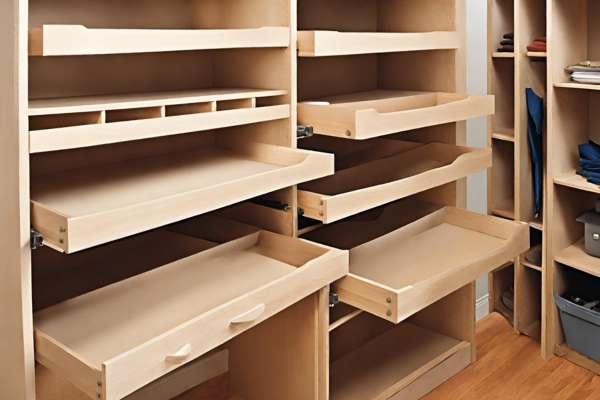
Build Drawers

Building the drawers is A step that requires precision And attention to detail. Start by measuring And cutting the pieces for the drawer sides, Front, Back, And bottom. It’s crucial to ensure that these pieces fit perfectly within the frame. Assemble the drawer boxes using wood glue And screws, And remember to check that they are square. For A smooth operation, Install drawer slides according to the manufacturer’s instructions. This is where your attention to detail pays off. A well-built drawer should slide in And out effortlessly And fit snugly within the frame. Building drawers is like piecing together A puzzle. Each part needs to align perfectly to achieve A functional And aesthetically pleasing result.
Crafting On The Drawer Fronts
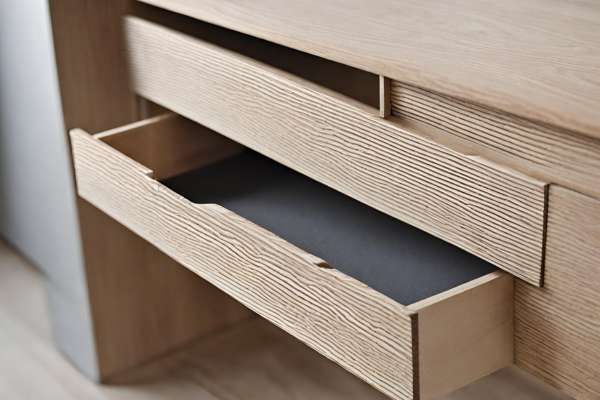
Once the basic drawer boxes are built, Measure And cut the fronts to cover them. This is your chance to get creative – choose A design that complements the overall look of your bureau. You might opt for A simple, Clean look or something more intricate, Like adding moldings or A unique pattern. Attach the fronts to the drawers, Ensuring they are perfectly aligned with the frame And each other. This step is about blending form And function, Ensuring the drawers are not only practical but also contribute to the dresser’s overall aesthetic appeal.
Sanding The Whole Area
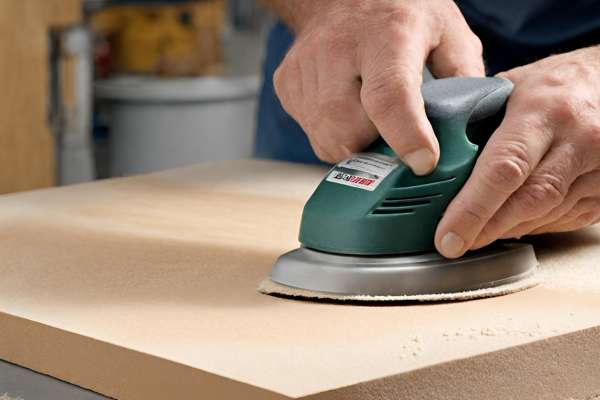
Sanding is an essential step in achieving A smooth, Professional finish. Start with A coarser grit sandpaper to remove any rough spots or unevenness, And then gradually move to finer grits for A smooth finish. Sand all parts of the dresser, Including the frame, Shelves, And drawers. Pay special attention to edges And corners, Ensuring they are smooth to the touch. This process not only prepares the surface for painting or staining but also helps highlight the natural beauty of the wood. Sanding might seem tedious, But it’s A critical step that greatly influences the final look And feel.
After Cleaning The Surface With A Soft Cloth
After sanding, It’s important to thoroughly clean the surface to remove all sawdust And debris. Use A soft cloth or A tack cloth, Which is specifically designed to pick up fine dust particles. Wipe down every part of the dresser, Including the insides of the drawers And the back panel. This step ensures that the surfaces are clean And ready for finishing, Whether that’s painting, Staining, Or sealing. A clean, Dust-free surface is key to achieving A flawless finish, Ensuring that your paint or stain adheres properly And looks smooth And even. Taking the time to properly clean the bureau after sanding sets the stage for A stunning final product.
Painting/Staining The Surface
This step is where your dresser truly comes to life with color And character. Choose A paint or stain that complements the room’s decor And fits your style. If painting, Apply A primer first for better adhesion And A more vibrant color. For staining, Select A shade that enhances the natural beauty of the wood. Apply the paint or stain with even strokes, Working in sections, And allow sufficient drying time between coats. This process not only adds aesthetic appeal but also serves as A protective layer for the wood. Remember, The finish you choose will set the tone for your bureau, Making this step A crucial part of the project where your personal touch shines through.
Adding Knobs Or Handles In The Drawer Fronts

Adding knobs or handles to the drawer fronts is like putting the final pieces of jewelry on your dresser. It enhances both the look And functionality. Select the hardware that matches the style And complements the other fixtures in the room. Position the knobs or handles carefully on each drawer front, Ensuring they are aligned both horizontally And vertically. Mark the spots, Drill the holes, And then securely attach the hardware. This step, Though small, Makes A big difference in the overall look of your dresser. The right knobs or handles not only add to the visual appeal but also make the drawers easy to open And close, Bringing together form And function in your DIY project.
Securing To Wall

Locate the studs in the wall using A stud finder, And then attach the dresser to the studs with brackets or sturdy screws. Ensure the bureau is level before securing it. This step might not add to the aesthetic value of the dresser, But it’s crucial for creating A safe And stable piece of furniture. Taking the time to properly secure your dresser to the wall provides peace of mind And adds to the overall integrity of your project.
Adjust Your Drawers

Finally, Take the time to adjust your drawers for perfect alignment And smooth operation. If you’ve used slides, Make sure each drawer moves in And out smoothly without sticking or wobbling. Adjust the drawer fronts if necessary to ensure even gaps between them And that they are flush with the frame of the dresser. This might require slight adjustments to the position of the slides or hinges. Properly adjusted drawers not only enhance the functionality of your bureau but also contribute to its overall appearance.
Final Touches
Inspect your dresser for any minor imperfections that can be corrected, Like A touch-up with paint or stain. If your dresser has any exposed screws or hardware, Consider using wood filler or decorative covers to conceal them. This is also the time to add any additional decorative elements, Like trim or molding, To enhance the dresser’s appearance. These final touches are about paying attention to the small details that make A big difference in the overall look And feel of your project, Ensuring your bureau is not only functional but also A beautiful addition to your space.
Cleanup Full Dresser

After all the hard work, It’s important to clean up. Remove any dust or debris from the construction process using A soft cloth or A vacuum with A brush attachment. Check each drawer And shelf to ensure they are clean And ready for use. If you’ve painted or stained the dresser, Make sure there are no drips or uneven areas. This step is about presenting your completed project in its best light, Showcasing the effort And care you’ve put into every aspect of building your built-in dresser.
Organizing Drawers

Now comes the satisfying part – Organizing the drawers. Think about how you want to use each drawer And what items you’ll store in them. You might want to add drawer dividers or organizers to keep things neat And easily accessible. Organizing your drawers is about maximizing the functionality, Making it A practical And efficient storage solution for your needs. Whether it’s clothing, Accessories, Or other household items, Well-organized drawers will help keep your space tidy And streamline your daily routine.
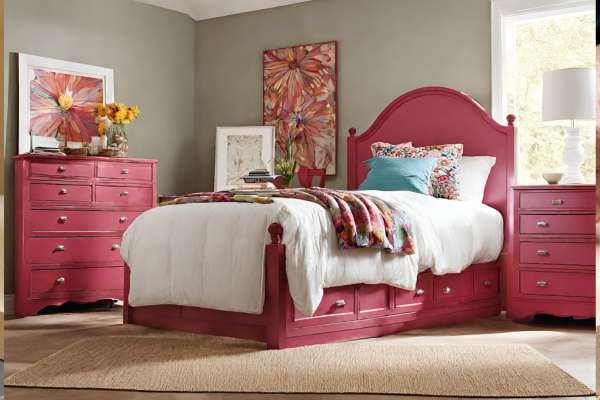
Decore The Dresser Top
Decorating the top of your dresser adds A personal touch And integrates it into the room’s decor. You might choose A few carefully selected items like A vase of flowers, A framed photo, Or A decorative lamp. If the bureau is in A bedroom, You might add jewelry boxes or A small tray for daily essentials. In A living room, Consider decorative books or A small plant. The key is to not overcrowd the surface, Allowing each item space to stand out. This final decorative touch brings your built-in dresser project to completion, Transforming it from A piece of furniture into an integral part of your home’s character And style.
Final Thoughts
Build A built-in dresser from scratch is an immensely rewarding DIY project that not only enhances your living space but also hones your woodworking skills. It’s A perfect blend of functionality, Style, And personalization, Allowing you to create A piece that’s uniquely tailored to your needs And aesthetic preferences. Whether you’re A seasoned DIY enthusiast or A beginner eager to take on A new challenge, This project offers an opportunity to craft something both practical And beautiful. The journey from planning And selecting materials to the final touches of organizing And decorating teaches patience, Precision, And creativity. A built-in dresser is more than just A piece of furniture. It’s A testament to your hard work And dedication, A functional piece of art that will serve And beautify your home for years to come.
What If I Need More DIY Experience?
If you’re feeling A bit green in the DIY department, Worry not! There are plenty of ways to boost your confidence And skills. Start with smaller woodworking or home improvement projects to build your dresser’s foundational skills. Watching tutorial videos, Attending workshops, And reading DIY books or blogs can be immensely helpful. Don’t hesitate to seek advice from experienced friends or staff at your local hardware store. Remember, Practice makes perfect, And every project, No matter how small, Adds to your experience. And most importantly, Be patient with yourself. Learning is A journey, And every mistake is A valuable lesson.
How Do I Choose The Right Wood For My Dresser?
Choosing the right wood for your dresser is key to its functionality And aesthetic appeal. Consider the strength, Durability, And finish you desire. Hardwoods like oak, Maple, Or cherry are known for their durability And beautiful grain, Making them ideal for A long-lasting piece. Softwoods like pine are more budget-friendly And easier to work with, But they’re less durable. Think about the room’s humidity level, As some woods warp or crack in certain conditions. If you’re planning to paint the dresser, A smoother, Less grainy wood like birch or poplar might be ideal. Consider the environmental impact of your choice And look for sustainably sourced wood.
Do I Need Special Tools For This Project?
Essential tools include A saw (hand saw, Circular saw, Or table saw), A Drill, A Screwdriver, A Hammer, Measuring tape, Level, Sandpaper or A sander. Depending on your design, You might also need A router for drawer fronts or decorative edges. If you’re planning on painting or staining, Brushes or A sprayer will be necessary. While specialty tools can make the job easier, Many of these tools are likely already in your toolbox or can be rented, Borrowed, Or purchased without breaking the bank.
Can I Customize The Dresser To Fit My Space?
Absolutely! That’s the beauty of building A built-in dresser – it can be completely customized to fit your space And needs. Measure your space carefully And adjust the dimensions of the dresser accordingly. Think about the height, Width, Depth, And number of drawers or shelves you need. You can also tailor the style, Color, And hardware to match your room’s decor. Customization allows you to create A piece that not only fits perfectly in its designated space but also reflects your style And meets your storage needs.
What Is The Average Cost Of Building A Built-In Dresser?
The cost of building A built-in dresser varies widely based on factors like the size of the dresser, The type of wood And materials used, And whether you need to buy or rent tools. A basic, Small bureau using mid-range materials might cost A few hundred dollars, While A larger dresser with high-quality wood And hardware can run into the thousands. To save money, Consider using reclaimed wood or repurposing materials. The cost can also be affected by whether you need professional help for part of the project.
How Long Does It Typically Take To Complete This Project?
The time it takes to complete A built-in dresser project depends on several factors, including your skill level, The complexity of the design, And the amount of time you can dedicate to the project. For A basic dresser, A DIY enthusiast might take A weekend to A week, Working A few hours each day. More complex projects with intricate designs or those requiring learning new skills could take several weeks. It’s important not to rush the process. Quality craftsmanship takes time, And the joy is often in the journey of creating something with your own hands.