
Are you tired of the glaring sunlight waking you up in the morning or your nosy neighbors peeping into your living room? It’s time to put up some curtains! Whether you’re A seasoned DIY enthusiast or A complete beginner, This article will guide you through the step-by-step process of how to put up curtains. From measuring your windows And selecting the right type of coverings to installing curtain rods And achieving that perfect drape – we’ve got you covered. Grab your tools, And let’s get started on transforming your space with beautiful curtains that not only enhance privacy but also elevate the overall aesthetic of any room.
Benefits Of Putting Up Curtains

Looking to add A touch of elegance And privacy to your home? Look no further than curtains! These versatile window coverings not only enhance the aesthetic appeal of any room but also offer several practical benefits. Whether you’re A seasoned DIY enthusiast or A novice.
Privacy
One of the most significant advantages of putting up curtains over blinds is privacy enhancement. They prevent outsiders from peeping into your personal space. They offer A simple yet effective way to maintain the confidentiality of your indoor activities, Making your home A sanctuary where you can move freely without feeling observed. Whether you live in A busy city or A quiet suburban neighborhood, Coverings ensure your comfort by creating A private, peaceful environment.
Light Control
Depending on their material And color, Curtains can help regulate the amount of light that enters A room. Sheer curtains filter daylight, Creating A soft, Diffused glow that illuminates the room without being too harsh. Blackout coverings can block out most light, Making them ideal for bedrooms or home theaters where darkness is preferred. By adjusting your coverings, You can easily manipulate the ambiance of A room to suit your preferences at any given time.
Temperature Regulation
During the summer months, They can help keep the heat outside, And in the winter, They can prevent warm air from escaping. Thermal or insulated curtains, For instance, Are designed to resist temperature transfer, Reducing the need for heating or cooling And, Consequently, Decreasing energy consumption. This dual functionality makes them an economical and eco-friendly option for maintaining A comfortable temperature year-round.
Noise Reduction
Certain types of heavy, Thick curtains can absorb sound waves, thereby reducing the amount of outside noise that penetrates your home. This can be especially beneficial in bustling city environments or homes near busy roads where traffic noise can be A nuisance. With the right set of coverings, Your home can remain A tranquil haven despite the cacophony outside.
Enhancing Decor And Style
They are also an integral part of A Room’s aesthetic appeal. With the vast array of colors, Patterns, And materials available, Curtains can complement or even define the decor And style of A room. They can add texture, Depth, And color to A space, Shaping its overall look And feel. Whether you prefer A minimalist, Classic, Or eclectic style, The right coverings can help convey your personal taste And enhance the overall charm of your home.
Gather The Necessary Tools
- Curtains Or Drapes
- Curtain Rods
- Curtain Brackets
- Measuring Tape
- Level
- Pencil
- Power Drill
- Screwdriver
- Wall Anchors
- Step Ladder
- Stud Finder (Optional)
- Finials (Optional)
Here Are Some Steps For How To Put Up Curtains
Measure The Window
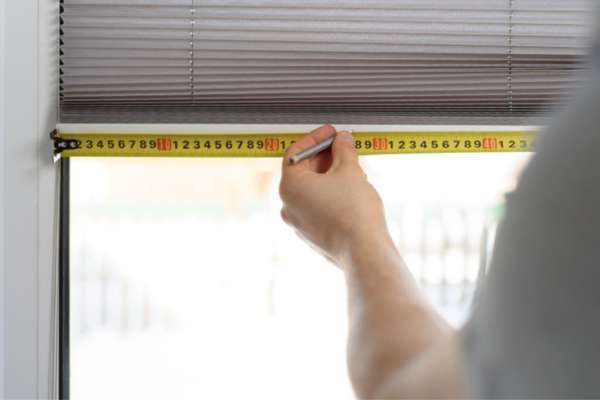
The first crucial step in hanging curtains is accurately measuring your window. Having precise dimensions will save you from making mistakes or unnecessary adjustments later on. Start by measuring the width of your window using A tape measure. Note down this measurement from the outermost part of the window frame to ensure that the curtain adequately covers the window when closed. Measure the length starting from the top of the window frame or from where you intend to hang the curtains down to your desired length. Some prefer their coverings to hang just below the window sill, While others prefer A floor-length style. Remember to add additional inches if you want your coverings to have A bit of an A drape at the bottom.
Choose The Curtains

The selection process is not merely about finding curtains that fit your window, It also involves finding coverings that complement your room’s decor And meet your functional requirements. Curtains come in various styles, Fabrics, Colors, And patterns. Some offer light filtering, While others provide room darkening or blackout features. Consider factors such as privacy, Light control, Insulation, And aesthetics while choosing. Remember that heavy fabrics provide more insulation And light blocking, While lighter materials offer A breezier, More airy look.
Select A Curtain Rod
Not only does it serve A functional role by holding up the curtains, But it also contributes to the aesthetic of the window treatment. When choosing A curtain rod, Consider the style, Weight, And width. The rod should be sturdy enough to hold the coverings without sagging And long enough to extend beyond the window frame to allow for maximum light when the coverings are open. For A cohesive look, The Design And finish of the curtain rod should match your room decor. Keep in mind that curtain rods are available in adjustable lengths, Which provides flexibility in fitting various window sizes.
Mark The Position

Before drilling holes into your wall, It’s essential to mark the position where you want the brackets to be installed. Use your pencil to lightly mark the spots where you’ll be placing the screws. The rod should be installed 4-6 inches above the window frame to give an illusion of height And allow the curtains to fall gracefully. Ensure it extends 3-6 inches beyond the window frame on either side to let in maximum light when the coverings are drawn aside. Use A level to make sure that the marks are even And straight across.
Install The Brackets
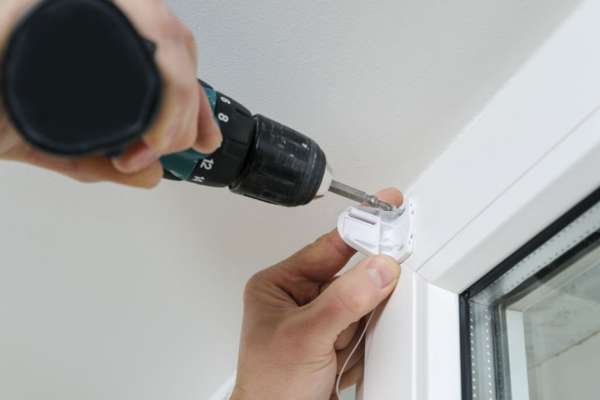
Depending on your wall type (drywall, Plaster, Brick, Or concrete), You might need wall anchors for additional support. Start by drilling pilot holes at the marks you’ve made. The hole should be large enough to fit the wall anchors snugly. Once the anchors are in place, Align the brackets over the holes And secure them with screws using the screwdriver. Ensure they are tight And secure but avoid over-tightening, Which could strip the screws or damage the wall.
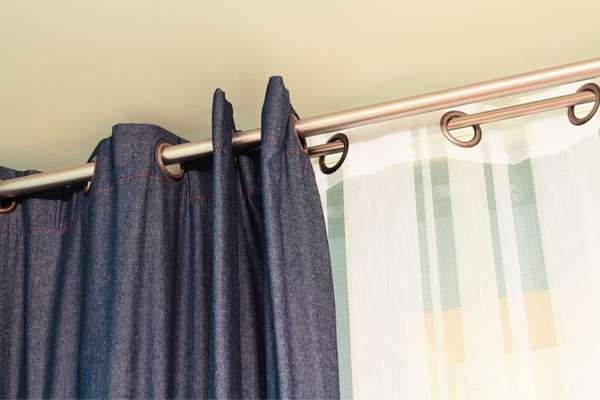
Attach Curtain Rod

Slide the curtain rings onto the rod, If necessary, Before positioning the rod in the brackets. Depending on the type of rod you have chosen, It might simply rest on top of the brackets, Or you may need to secure it with additional screws. Make sure the rod is firmly placed And balanced on both brackets. If the rod is extendable, Ensure it’s adjusted to the right width, Covering the window completely.
Test The Movement

Gently slide the curtains along the rod from one end to the other. They should move smoothly without any hitches. If the coverings are catching or if the rod is sagging, You might need to make some adjustments. Step back And view the coverings from different angles in the room to make sure they hang as you envisioned. Inspect the coverings in different light conditions (drawn, Half-open, Fully open) to ensure they meet your functional needs. This step is important to confirm the successful installation and to make any necessary final tweaks.
Measure The Curtain Length

This will be based on your earlier measurements of the window, As well as your personal preference for how you want the curtains to hang. Curtains either touch the windowsill, Hover above the floor, Or pool slightly on the ground. To measure, Hang the curtain on the rod And let it fall naturally. Mark the desired length on the fabric with A fabric pencil. Be sure to add an extra inch or two for the hem allowance.
Hem The Curtains

Start by removing the curtains from the rod. Lay the curtain flat on A clean surface And use A straightedge or ruler to draw A line across the fabric where you marked it. Cut along this line with A pair of fabric scissors, Ensuring the cut is as straight as possible. Fold over the bottom edge by the amount you allowed for the hem (typically one to two inches), And secure with pins. You can then sew the hem by hand or use A sewing machine, If available. If you prefer A no-sew method, You can use hemming tape, Which only requires an iron to adhere.
Hang The Curtains

Start by inserting the curtain rod through the top hem, Or attaching the curtain rings or hooks if your curtain requires them. Lift the curtain rod into place, Ensuring it rests securely on the brackets. Arrange the fabric so it hangs evenly, And make any final adjustments needed to achieve the look you want. It’s also A good idea to step back And view the curtains from different parts of the room to ensure they look right from all angles. Remember to open And close the coverings A few times to confirm they move smoothly along the rod.
Finishing Touches
Put up curtains can be A straightforward And rewarding DIY project. By following these steps, You can achieve A professional-looking result that enhances the aesthetic appeal of your space while also providing privacy And light control. Remember to measure accurately, Choose the right hardware And curtain style for your needs, And take your time during installation. Whether you are looking to update your living room, Bedroom, Or any other area in your home, Installing coverings is A great way to add both functionality And style. So go ahead And get started on transforming your space with beautiful coverings today!