
Grommet curtains have gained immense popularity in the world of interior design due to their sleek and modern appearance. As compared to traditional rod pockets, grommet hangings offer a more contemporary look while also providing ease of use. However, for those who are unfamiliar with this style of window treatment, figuring out how to hang grommet curtains can be quite daunting. But fear not! In this article, we will guide you step by step on how to properly hang grommet curtains, ensuring that your windows are adorned with elegance and functionality. Whether you are a DIY enthusiast or want to update the look of your space, follow our expert advice for seamless installation and perfect draping every time.
What are Grommet Curtains?
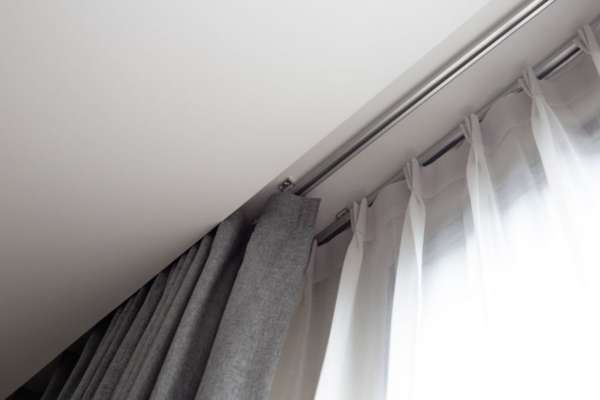
Grommet curtains, also known as eyelet curtains, are a type of window treatment that uses grommets to hang the fabric panels from a curtain rod. The metal or plastic grommets, Which are usually equally located around the top edge of the curtain, Give it A tidy And professional appearance. Grommet hangings are designed to slide smoothly along the rod, allowing for easy opening and closing.
Why Choose Grommet Hangings?
You might think about using grommet hangings for your windows for several reasons. First off, Have A modern, Chic appearance that might improve your room’s overall design. They have straight, elegant forms that go well with contemporary interior design trends.
Grommet hangings are simple to put up. You can have your hangings hung and ready to use with just a few easy steps. Grommet hangings may quickly install, unlike other window coverings that could need additional hardware or difficult installation procedures.
They are also useful and practical. They are made to slide along the rod easily, making opening and shutting simple. Hang evenly thanks to the precisely spaced grommets, giving them a polished and businesslike appearance.
Tools and Materials Needed

Before you start hanging your grommet hangings, gather the necessary tools and materials. Here’s what you’ll need:
- Curtain rod
- Measuring tape
- Level
- Pencil
- Drill or screwdriver (depending on the type of rod)
- Wall anchors (if needed)
- Step ladder (if necessary)
Step 1: Measure and Mark

Measuring and marking the location of the curtain rod is the first step in hanging curtains. Determine the appropriate height and breadth of the hangings using a measuring tape. To ensure that completely enclose the window when closed, the curtain rod should protrude beyond the window frame. Once you have the measurements, mark both sides of the window with a pencil the height you want the curtain rod to be. To make sure the marks are straight and level, use a level.
Step 2: Choose the Right Rod
The next step is to pick a curtain rod that matches your needs and the design of your curtains. Both tension rods and conventional curtain rods can use to hang grommet curtains.
Since tension rods don’t need drilling or other hardware, they are a popular option for grommet hangings. These rods, which are held in place by tension, can adjust to fit the width of your window. They are nevertheless limited in weight, so be careful to pick a tension rod that can hold the weight.
Traditional curtain rods need to drill into and secured with brackets. These poles are more stable and strong enough to hold heavier drapes. Make sure the rod you choose is wide enough to extend past the window frame and that it suits the look you are going for.
Step 3: Install the Rod

Simply twist a tension rod to change its breadth and fit it into the window frame if you’re using one. Use a level tool to check that the rod is level. You can move on to the following step after the rod is stable and level.
Follow the manufacturer’s instructions to install the brackets and fasten the rod in place for conventional curtain rods. Make sure the brackets are level and positioned in line with the stated locations before fastening them to the wall with a drill or screwdriver. Consider utilizing wall anchors to add additional support if your curtains are especially heavy. When mounting curtain rods on drywall or plaster, wall anchors come in very handy.
Step 4: Prepare the Curtains

Before hanging the curtains, it’s important to prepare them for installation. Start by removing any packaging or tags. If they are wrinkled, You can iron them or use a fabric steamer to remove the wrinkles and ensure a smooth appearance.
If necessary, measure the length of them and use A sewing machine or fabric glue to hem them to the desired size. Hemming this will give them a polished look and prevent any excess fabric from dragging on the floor.
Step 5: Thread the Grommets

Now it’s time to thread the curtains onto the rod. Begin by opening the grommets along the top edge of the curtain. The grommets should be evenly spaced and large enough to fit the curtain rod. Starting from one end, insert the curtain rod through the grommets, sliding it gently along the rod until the entire curtain is threaded. By inserting the rod through the grommet holes, Be cautious not to damage the fabric or the grommets.
Step 6: Hang the Curtains

With the curtains threaded onto the rod, it’s time to hang them. If you’re using a tension rod, simply position the rod at the desired height within the window frame. The tension of the rod should keep it in place. For traditional curtain rods, lift the rod attached And position it on the brackets. Make sure the rod is securely in place before letting go.
Step 7: Adjust and Style

Once the curtains are up, step back and evaluate how they look. To ensure that hang uniformly and satisfactorily cover the window, make any necessary adjustments. Check their alignment and levelness from a distance.
They are now ready for your unique style and touch. You can carefully arrange the fabric folds to achieve a tidy and tailored appearance. Play around with the curtain placement to get the look and drape you want.
Tips for Hanging Curtains
- Choose bigger curtain panels if your windows are large to offer complete coverage and an opulent impression.
- Keep the curtains looking clean and wrinkle-free by using a fabric refresher or steamer.
- Combine grommet hangings with a valance or cornice board for a more formal appearance.
- Try out various curtain lengths and hues to discover the ideal look for your room.
Maintenance and Care
To keep your grommet curtains in good condition, regular maintenance and care are essential. Here are some tips:
- Regularly dust or vacuum.
- For detailed cleaning suggestions, refer to the manufacturer’s care instructions.
- Use cold water and a mild cycle if you can machine wash. To avoid shrinking or damage, air-dry the curtains or use a low heat setting in the dryer.
- Use a soft cloth or sponge and mild detergent for spot cleaning. Gently blot the discoloration without rubbing it.
- The grommets and fabric of the hangings can damage by applying harsh chemicals or bleach.
- If they wrinkle, you can remove the creases by using a low-heat setting on an iron or fabric steamer.
Conclusion
Hanging grommet curtains is a simple and effective way to add style and functionality to any room. By carrying out the procedures described in this article. You can ensure that your curtains are hung properly and will provide the desired look and function. Remember to measure accurately, choose the right hardware, and take your time during the installation process. Whether you are a seasoned DIY enthusiast or a beginner, hanging grommet hangings is an achievable task that can transform the ambiance of your space.