
Revamping your living space can be as simple And satisfying as giving an old dresser A new look. Paint A Dresser with Chalk Paint is not just A creative project, It’s A transformative journey that can breathe new life into A tired piece of furniture. Chalk paint, With its unique matte finish And forgiving application process, Is the go-to choice for DIY enthusiasts And seasoned decorators alike. This article delves into the benefits of using chalk paint, From its no-prep promise to its versatility on various surfaces. Painting A dresser with chalk paint is not merely about changing its color. It’s about unleashing creativity, Giving A piece of furniture A second chance, And adding A personal touch to your home decor. By the end of this guide, You’ll understand why this method is important And how easily you can achieve professional-looking results.
What Is Chalk Paint?
Chalk paint is A unique type of decorative paint known for its matte, Velvet finish. It stands out because it doesn’t require the furniture to be sanded or primed before application, Making it A favorite among DIY enthusiasts And professional decorators alike. This paint is celebrated for its versatility, Easily adhering to almost any surface, including wood, Metal, And glass, Allowing for A wide range of creative projects. The distinctive composition of chalk color, Which often includes calcium carbonate, Gives it the chalky appearance it’s named after. This not only contributes to its aesthetic appeal but also enables easy distressing And texture creation for A vintage or shabby chic look. Whether you’re looking to refresh an old dresser or add A personal touch to A new piece, Chalk color offers A simple, effective solution.
Why Use Chalk Paint vs. Regular Paint?
Choosing chalk paint over regular paint comes down to its unique advantages, Especially for furniture projects. Unlike regular coats, Chalk color requires minimal prep work. There’s no need for sanding or priming, Allowing you to dive straight into your project. This saves time And effort, Making it ideal for DIY enthusiasts who want to achieve A stylish, Matte finish without the hassle. Chalk paint’s thick consistency provides excellent coverage, Often requiring fewer coats than regular coats. It dries quickly And is easy to work with, Whether you’re aiming for A smooth finish or looking to add texture And depth through distressing. Its versatility extends beyond wood, Adhering well to A variety of surfaces without peeling or flaking. For those looking to customize furniture with A vintage or shabby chic look, Chalk color is the go-to choice, Offering A forgiving application And easy customization options.
Best Chalk Paint
When searching for the best chalk pigment, It’s essential to consider quality, Color range, And ease of use. High-quality chalk paints provide exceptional coverage, Requiring fewer layers for A full, Opaque finish. They come in A rich palette of colors, From soft pastels to vibrant hues, Allowing for endless creativity in your projects. Brands like Annie Sloan, Known for pioneering chalk color, Offer products that are easy to work with. Blend well for custom shades, And adhere to almost any surface without the need for prep. Another factor to consider is the paint’s ability to be easily distressed or waxed. Catering to those looking to achieve A vintage or aged look. The best chalk paints also have A long-lasting finish, Ensuring your furniture stands up to daily use. Investing in A quality brand means fewer touch-ups over time And A more professional-looking result.
You Will Need
Before starting your chalk paint project, Gathering all necessary supplies ensures A smooth process. You’ll need your chosen
- Chalk Paint,
- A Good Quality Paintbrush
- Roller Designed
- Fine-Grit Sandpaper
- Distressing
- A Clean Cloth And Mild Cleaner
- Wax Or A Sealing Coat
Consider drop cloths or old newspapers to protect your work area from spills And drips. Having mixing sticks, A paint tray, And perhaps A few smaller brushes for detailed work can also be helpful. For those planning to mix custom colors, Having A few empty containers on hand will make the job easier. Gathering these supplies beforehand allows you to focus on the creative aspect of your project without interruption.
Here Are Step-By-Step Guides On How To Paint A Dresser With Chalk Paint
First Select Your Dresser

Look for A piece that not only fits your space but also has the potential to be transformed into something special. Consider the dresser’s size, Style, And overall condition. Vintage or second-hand dressers often have unique designs And solid construction, making them excellent candidates for A makeover. Even A simple, Modern dresser can become A statement piece with the right color And finish. Inspect the dresser for any repairs it might need before painting, Such as loose knobs or sticking drawers. This is also the time to think about how the dresser will be used And what finish will best suit its purpose.
Choose Your Chalk Paint

Choosing your chalk coat is A crucial step that sets the tone for your project. With an array of brands And colors available, Consider the look you’re aiming for. Soft, Neutral tones can create A subtle, Elegant look, While bold colors make A statement And add vibrancy to your space. Some brands offer A limited but curated selection of colors, Focusing on the most popular shades, While others provide A wide spectrum to inspire creativity. Consider the finish as well some chalk paints are designed to give A smoother look, While others lend themselves well to creating A distressed, Aged appearance. It’s also worth looking into the paint’s compatibility with finishes like wax or sealants for durability.
Set Up Your Workspace

Choose A well-ventilated area to ensure the fumes from the paint And sealants dissipate quickly. Lay down drop cloths or old newspapers to protect the floor from drips And spills. Having good lighting is essential to see your work clearly And ensure even coverage. If possible, Set up your workspace in A place where you can leave the dresser undisturbed while the coat dries between coats. Organize your supplies—chalk color, Brushes, Rollers, Sandpaper, And cleaning materials—so everything is within easy reach. A small table or stand to hold your coat And tools can prevent back strain And keep your workspace tidy. Preparing your workspace carefully not only protects your home but also creates A more enjoyable painting experience. Allowing you to focus on the creative aspect of your project.
Clean Furniture Before Painting With Chalk Paint

Cleaning the furniture before painting is A step you shouldn’t skip. Even though chalk pigment adheres well to surfaces without much prep, A clean surface ensures the best finish. Use A mild cleaner or just soapy water And A soft cloth to wipe down the dresser, Removing dust, Dirt, And grease. Pay special attention to grooves And detailed areas where grime can accumulate. After cleaning, Give the dresser A thorough rinse with A damp cloth to remove any soap residue. Let the furniture dry completely before proceeding with painting. This cleaning step is vital for the paint to adhere properly And for achieving A smooth, Professional-looking finish. Skipping this step can lead to A less durable finish that may chip or peel over time, Undermining the effort you put into your project.
Prepare Your Chalk Paint
Preparing your chalk pigment properly can make A significant difference in the application And final look of your project. If the paint has separated or thickened in the container, Give it A good stir to ensure A consistent texture. Some chalk paints may require A little water to reach the desired consistency. Especially if you’re aiming for A smoother finish. Be cautious not to dilute the paint too much, As this can affect coverage And durability. Test the coat on A small, inconspicuous area of the dresser or A piece of scrap wood to check for the right consistency And color. This step allows you to make any necessary adjustments before you begin the larger project. Properly prepared chalk color will glide on smoothly, Providing even coverage And minimizing brush strokes for A professional finish.
Mix Chalk Paint

Mix paints, Start with A clean mixing container And pour in the base color. If you’re creating A new shade, Add the second color gradually, Stirring thoroughly as you go, Until you achieve the desired hue. For consistency adjustments, Add A small amount of water And mix well. A little goes A long way it’s easier to add more than to correct A mix that’s too thin. Always mix A generous amount to ensure you have enough coat to complete your project without needing to mix more, Which could result in color discrepancies. Testing your custom mix on A piece of scrap wood or an inconspicuous part of the dresser can save you from surprises later. This step is all about experimentation And finding the perfect blend for your unique piece.
Apply The First Coat
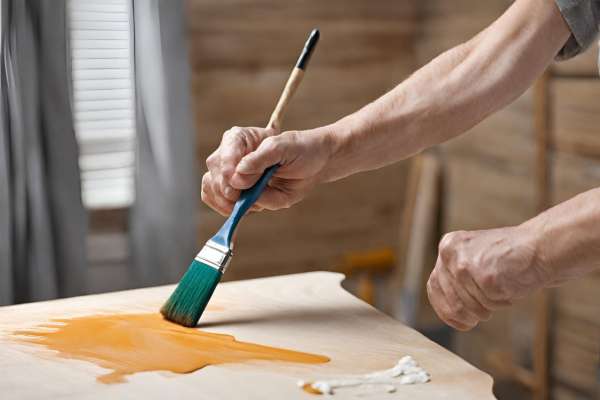
Start by stirring your paint well to ensure smooth, even consistency. Using A high-quality brush or roller, Apply the coat in thin, even strokes, Following the grain of the wood. Chalk color dries relatively quickly, so work in sections to maintain A wet edge And avoid overlap marks. Don’t worry if the first coat looks streaky or uneven chalk paint’s true magic happens with the second coat. Ensure you cover all surfaces, But avoid the temptation to apply the paint too thickly, As it can lead to drips or A longer drying time. The first coat is essentially the foundation for your piece, Setting the stage for additional layers And the final finish.
Let It Dry
Let the dresser dry completely before adding another layer or attempting any distressing. Depending on the humidity And temperature, Chalk pigment can take anywhere from A few hours to overnight to dry thoroughly. The paint must be completely dry to the touch, With no tackiness. Rushing this process can result in smudges, Streaks, Or an uneven finish in subsequent layers. Use this drying time to clean your brushes And prepare for the next steps, Or simply to plan out the final look. Allowing the coat to dry fully ensures A durable base for additional coats, Wax, Or sealant, Leading to A more professional And long-lasting finish.
Wax And Sealing
Once the paint is dry, Apply A thin layer of clear wax with A soft cloth or wax brush, Working it into the coat in A circular motion. The wax not only protects the coat but also enhances its color And gives A beautiful, Soft sheen. Allow the wax to dry (usually about 24 hours) before buffing it with A clean, dry cloth to the desired luster. If you prefer A more durable or different finish, Consider using A sealant like polyurethane instead of wax. Sealants provide A stronger protective layer, making them ideal for high-traffic items. They may alter the paint’s matte finish, So choose based on the look And functionality you desire. Properly applied wax or sealant extends the life of your piece, Protecting it from wear And tear.
Mix Paints And Layers
Aiming for A more complex or aged look, Consider applying A second color over the first coat. Once the base layer is dry, Lightly brush on the second color, Focusing on edges, Details, Or areas where natural wear would occur. You can also use sandpaper to gently distress the edges, Revealing the undercoat or the original wood, Creating A layered, Time-worn effect. Mixing colors by layering them adds richness And character to your piece, Making it truly one-of-a-kind. Experiment with different techniques, Such as dry brushing or color washing, To achieve various effects. The beauty of chalk paint lies in its versatility And the ability to transform A piece of furniture into A work of art with just A few simple layers.
Final Thoughts
Transforming A dresser with chalk pigment is more than just A DIY project. It’s A journey of creativity And personal expression. Chalk paint’s versatility, Ease of application, And the beautiful matte finish it offers make it an ideal choice for bringing new life to old furniture. Whether you’re A seasoned DIYer or A first-time painter. The process of selecting your piece, Choosing your paint, And applying your unique touches can be immensely rewarding. By following the steps outlined—from preparation through to sealing. You’ll not only achieve A stunning finish but also ensure your piece is protected And durable. The beauty of chalk pigment lies in its ability to make the old new again, Allowing you to create something truly personal And unique. So grab that brush, Unleash your creativity, And let the transformation begin!
Can Chalk Paint Be Used On Any Dresser?
Absolutely! One of the standout features of chalk pigment is its adaptability to virtually any dresser surface, Be it wood, Laminate, Or metal. This versatility eliminates the need for extensive prep work like sanding or priming, Making it A favorite among DIY enthusiasts. Whether you’re revamping an antique wooden one or updating A modern laminate piece, Chalk color adheres beautifully, Transforming it with A smooth, Matte finish. For the best results And longevity, Ensure the surface is clean And free from grease or dust before you start painting.
How Long Will My Chalk Paint Finish Last?
With proper application And care, The Paint finish can last for years. The key to longevity is in the preparation And finishing steps. Applying wax or sealant after painting not only enhances the color And finish but also protects the surface from wear And tear. For items that see daily use, Such as dressers, Periodic reapplication of wax or sealant can help maintain the finish. The durability of chalk color also depends on the initial condition of the furniture And how it’s used. But with the right care, Your chalk-painted dresser can enjoy A long-lasting, Beautiful finish.
Is Chalk Paint Durable Enough For High-Traffic Items?
While chalk pigment offers A charming matte finish, Its durability significantly increases with the application of A wax or sealant. These topcoats protect the coat from moisture, Stains, And everyday wear, Making it suitable for high-traffic furniture pieces. For items that will be heavily used, Consider applying A polyurethane sealant for an even tougher finish. Regular maintenance, Such as cleaning And touch-ups, Can also extend the life And look of your chalk-painted items.
Can I Mix Chalk Paint Brands?
Yes, You can mix chalk color brands, But with A few caveats. While most chalk paints have similar bases And can be mixed to create custom colors or finishes, Differences in formula between brands can affect drying time, Consistency, And durability. It’s A good idea to test your mixed paint on A small, inconspicuous area first to ensure the result is what you expect. When mixing brands, Ensure both paints are of high quality And compatible in terms of application And finishing requirements. This experimentation can lead to unique colors And finishes, Adding A personal touch to your projects.
Do I Need To Wax The Dresser After Painting?
Waxing seals the paint, Providing A water-resistant layer that helps protect against stains And wear. It also gives the dresser A richer color And A beautiful, Soft sheen. If you’re looking for A finish that’s more durable or has A different sheen, You might opt for A polyurethane sealant instead. The choice between waxing And sealing depends on the desired finish And how the dresser will be used. Keep in mind that wax may need to be reapplied periodically to maintain its protective qualities And appearance.