Creating your own bookshelf can be a rewarding and practical project, offering both aesthetic and functional benefits to any space. Learning how to make a bookshelf allows you to customize the design to fit your unique style and storage needs, whether you want a modern minimalist look or a rustic charm. This DIY project not only saves you money but also gives you the satisfaction of building something with your own hands. By making a bookshelf, you gain valuable skills in woodworking and design, and you can ensure that the materials and craftsmanship meet your high standards. With the right tools and guidance, anyone can embark on this project and create a beautiful, durable book rack that will stand the test of time.
How Can I Ensure My Bookshelf Is Sturdy?
Ensuring that your bookshelf is sturdy involves a few key steps. First, make sure to choose a high-quality material for your bookshelf, such as solid wood or metal, which will provide better stability and durability. Additionally, consider the design of the bookshelf – opt for one with a back panel or cross-bracing to prevent it from wobbling.
Can I Make A Bookshelf Without Power Tools?
Yes, you can definitely make a bookshelf without power tools. There are several ways to construct a book rack using hand tools such as a hammer, nails, screws, screwdriver, saw, and sandpaper. You can use pre-cut lumber or have the wood cut to size at the store to minimize the need for power tools.
Measuring The Space

Before you begin to make a bookshelf, accurately measuring the space where it will reside is crucial. Start by determining the height, width, and depth of the area to ensure your bookshelf fits perfectly. Proper measurements help avoid any surprises during the assembly process and ensure your book rack will be both functional and aesthetically pleasing. Use a tape measure and mark your dimensions on the wall with painter’s tape to visualize the final product. This step is essential for creating a book rack that maximizes your available space while meeting your storage needs.
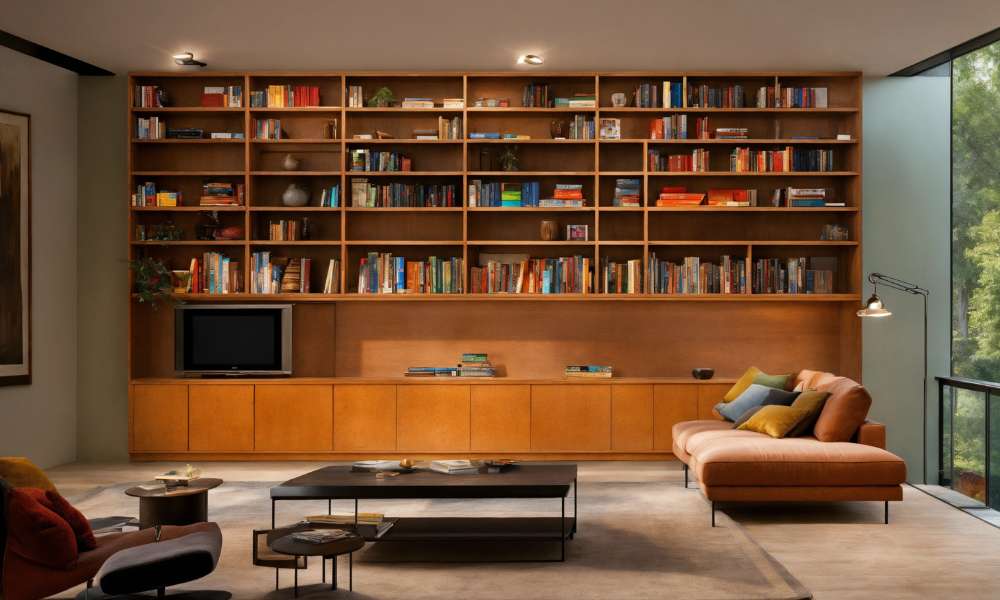
Adding The Back Panel

Adding the back panel is a vital step when you make a bookshelf, providing stability and preventing books from falling out the back. Choose a sturdy material like plywood or MDF for the back panel to ensure durability. Measure and cut the back panel to fit snugly within the frame of your bookshelf. Attach it using wood glue and nails or screws, making sure it is properly aligned and securely fastened. A well-installed back panel enhances the overall structure and longevity of your book rack, ensuring it can support the weight of your book collection.
Techniques For Cutting Accurately

Accurate cutting is essential when you make a bookshelf, as precise cuts ensure a professional finish and easier assembly. Use a circular saw or table saw for straight cuts, and consider a miter saw for angled cuts. Always measure twice and cut once to avoid mistakes. Employing a straight edge or a guide will help keep your cuts straight and clean. Sand the edges after cutting to remove any rough spots. Mastering these techniques for cutting accurately will result in a book rack that is both visually appealing and structurally sound, providing you with a custom piece that showcases your craftsmanship.
Securing The Bookshelves
Securing the bookshelves is another crucial step in making a bookshelf. Properly anchoring your book rack to the wall prevents tipping and ensures the safety of your household, especially if you have young children or pets. Use appropriate wall anchors and brackets that match the weight and size of your book rack. It’s also essential to distribute the weight evenly across the shelves to prevent sagging or warping over time. By taking these precautions, you can enjoy a safe and reliable storage solution for your books and decorative items.
Ensuring Long-Term Durability
One key aspect to ensuring long-term durability in your living space is selecting the right materials for your furniture. When decorating around a TV stand, opting for high-quality and durable materials such as solid wood or metal can significantly enhance the longevity of your furniture pieces. Additionally, consider investing in furniture with a timeless design that will remain stylish and relevant for years to come.
Reinforcing The Structure
Reinforcing the structure is a crucial step when you make a bookshelf, particularly if you plan to store heavy items like books. Start by adding a back panel to your bookshelf, which not only provides stability but also prevents the shelves from bowing. Securely anchoring the book rack to the wall using brackets or screws adds an extra layer of safety, especially in homes with children or pets. Incorporate additional support, such as middle vertical dividers or adjustable shelf brackets, to distribute weight more evenly. These reinforcements help maintain the bookshelf’s integrity and prevent sagging, ensuring it remains a sturdy fixture in your home.
Options For Decorative Molding
Adding decorative molding is a fantastic way to elevate the aesthetic appeal when you make a bookshelf. Crown molding, base molding, or trim can transform a simple bookshelf into a statement piece that complements your interior décor. You can choose from a variety of styles, from classic to contemporary, to match your personal taste. Installing molding is relatively straightforward and can be done with basic tools like a miter saw and nail gun. These finishing touches not only enhance the visual appeal but also add value to your handcrafted book rack, making it a focal point in any room.
Polishing For A Professional Look
Polishing your bookshelf for a professional look is the final step to complete your project. Sanding the wood surfaces thoroughly ensures a smooth finish, free of any rough patches or splinters. Applying a wood conditioner before staining helps achieve an even color, while a top coat of polyurethane or varnish adds a protective layer and a subtle sheen. Opt for multiple thin coats rather than a single thick one for the best results. Properly polished, your bookshelf will not only look professionally made but also be better protected against daily wear and tear, maintaining its beauty and functionality for years.
The Final Thought
Building your own bookshelf can be a rewarding and fulfilling project that adds both functionality and style to your home. By following the steps outlined in this article, you can create a customized piece of furniture that perfectly suits your needs and space. Remember to use high-quality materials and take your time to ensure a sturdy and durable finished product. Once your book rack is complete, enjoy filling it with your favorite books and decorative items to showcase your personal style.