Creating moss wall art is an innovative way to bring the beauty of nature into your home or office space. With its wealthy textures and calming greenery, moss wall artwork gives a completely unique and organic contact to any interior design. Unlike traditional houseplants, preserved moss calls for minimal preservation, making it ideal for individuals who want the benefits of greenery without the problem of consistent care. Whether you’re looking to enhance a modern, minimalist room or add natural elements to a more eclectic style, learning how to make moss wall art allows you to craft a one-of-a-kind piece that reflects your personal taste. From selecting the right moss to arranging it artistically on your chosen frame, this project is both accessible and rewarding. In this manual, we’ll walk you through the steps to create your very own stunning mosses wall art, supplying suggestions and innovative thoughts to personalize your masterpiece.
Choosing The Right Moss For Your Wall Art

The type of moss you choose can make or break the visual impact of your moss wall art. Each range gives a completely unique texture, a wonderful shape, and a unique contribution to the overall composition.Sheet moss is the perfect foundation, lying flat with a lush, velvety surface that resembles a soft forest floor. Reindeer mosses, in contrast, stands tall and bushy, with a spongy texture that adds an ethereal, almost whimsical quality. Then there’s cushion moss—dense, rounded, almost pillow-like—perfect for adding layers and depth. The best part? Preserved moss retains its natural vibrancy, staying colorful and tactile without the need for sunlight or water. High-satisfactory, sustainably sourced mosses is prime right here, making sure not handiest the toughness of your art however additionally a commitment to green practices. Choose accurately, and your wall will continue to be a colorful, dwelling tapestry for years to come.
Essential Tools And Materials For Moss Wall Art
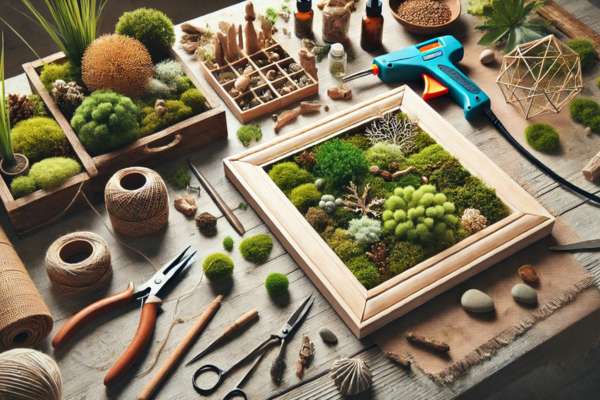
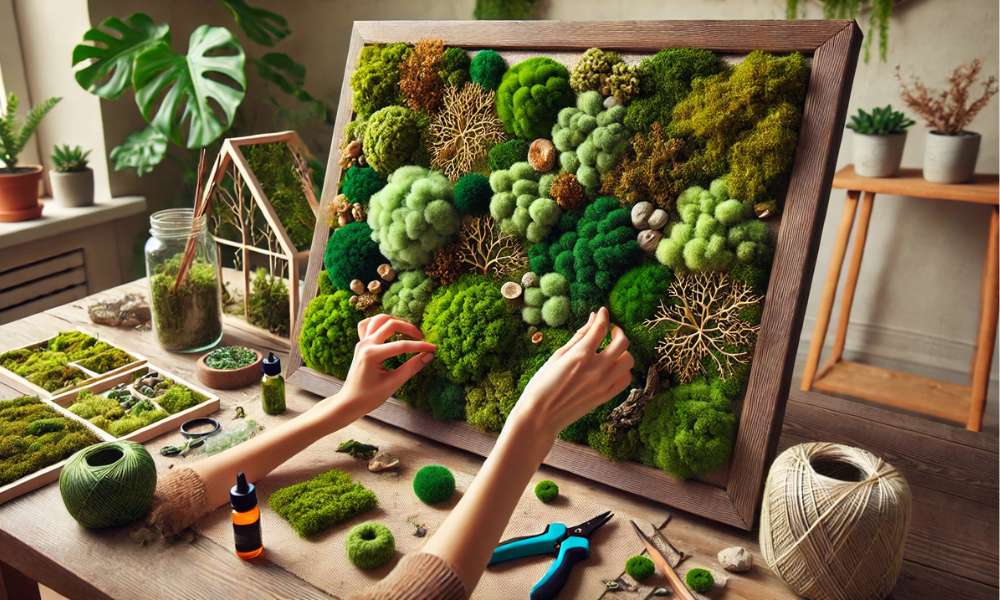
Before you embark on your moss-art journey, preparation is crucial. First, you’ll need a strong frame or base—wooden panels offer a rustic feel, while metal backings provide a sleek, modern contrast. A hot glue gun becomes your best friend in this project, ensuring that each tuft of mosses adheres securely without damaging its delicate structure. Don’t forget the smaller tools: scissors for precision trimming and tweezers for handling finer details with care. If you’re feeling adventurous, driftwood, pebbles, and even small figurines can be woven into the design, enhancing the natural feel with other elements from nature. Every tool, every material, plays its part in transforming an empty frame into a living, breathing work of art.
Designing Your Moss Wall Art

The design phase is where imagination takes the wheel. Start with the story you want your wall art to tell. Is it an homage to nature’s uncooked beauty, or a minimalist interpretation of natural bureaucracy? Mosss is an exceedingly flexible medium, lending itself to simplistic designs and extra complex, multi-textured compositions. Balancing numerous mosses sorts can create an intriguing evaluation, whilst the use of negative space permits the design to respire, including an detail of sophistication.Don’t be afraid to experiment with form—arrange your mosss into geometric patterns, or let it flow freely like a natural landscape. With mosses, the possibilities are endless, and the only limit is your creativity.
Step-By-Step Instructions For Making Moss Wall Art

1. Prepare the Base: Clean your chosen frame or panel thoroughly to ensure a strong bond. Lay it flat and decide on the layout—vertical or horizontal.
2. Arrange the Mosses: Before committing to glue, loosely arrange the mosses on the base. Experiment with positioning to create depth and texture. This is the time to play with your vision.
3. Attach the Mosss: Once satisfied with the arrangement, start securing the moss with a hot glue gun. Work in small sections, pressing the mosses firmly to the base while allowing time for the glue to cool.
4. Add Decorative Elements: After the mosses is attached, it’s time to bring in other natural elements—driftwood for an earthy touch, stones for added texture, or even small accents like feathers or crystals.
5. Finishing Touches: Once complete, step back and review your creation. Adjust any areas that need more volume or refinement. Ensure every section flows seamlessly.
Caring For Your mosses Wall Art
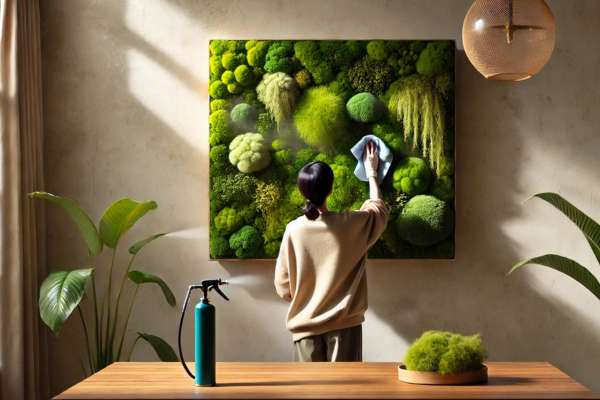
One of the greatest joys of moss wall art is how little attention it demands. Unlike traditional houseplants, preserved moss doesn’t need sunlight or water. That said, a little care can go a long way. Over time, dust may accumulate on the surface—simply brush it away with a soft cloth or use compressed air for harder-to-reach places. Avoid direct sunlight, as it can cause the moss to fade prematurely. With just occasional dusting and careful placement, your mosses arts will continue to thrive, maintaining its verdant beauty for years to come.
Choosing The Best Location For Your Moss Wall Art

Placement matters as much as the art itself. Choose a space that complements the natural vibes of the moss—think of living rooms, offices, or even bedrooms where the calming green tones can shine. Hallways are another perfect spot, as mosses art greets visitors with a refreshing burst of nature. But be mindful of humidity levels—while preserved moss thrives indoors, excessive humidity may cause the mosses to lose its form. If you live in a particularly humid area, consider placing it in drier rooms, away from bathrooms or kitchens.
Creative Ideas For Customizing Your Moss Wall Art

Customization is where your artistic spirit can truly soar. mosses buy wall art is not just limited to green expanses—add dimension and personality by incorporating other materials. Wooden accents, metallic details, or even pops of color from dried flowers can elevate your design. Get creative with stencils to form letters, shapes, or even elaborate landscapes. These little details infuse your creation with a personal touch, making it a statement piece that reflects your unique style.
Troubleshooting Common Issues With Mosses Wall Art

As effortless as moss wall art may seem, occasional hiccups can occur. If you notice sections of mosses becoming loose, simply reapply glue and press firmly. Faded colors can often be revitalized by removing the arts from direct sunlight. Brittle moss? That could be due to an overly dry environment—try moving it to a more humid spot. But remember, too much moisture can lead to mold, so strike a balance to keep your mosses looking fresh.
Tips For Preserving The Color And Texture Of Your mosses Wall Art
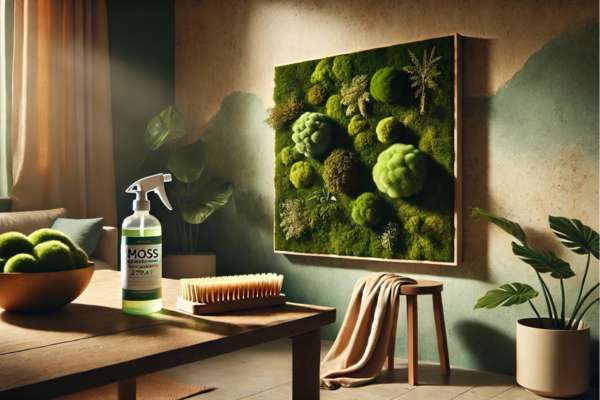
To keep the lush greens and delicate textures intact, it’s important to control exposure. Direct sunlight is the enemy—keep your art away from windows where the sun might bleach the moss over time. A gentle cleaning every few months with a soft brush will help avoid dust buildup. If you want to go the extra mile, applying a moss-specific preservative spray can rejuvenate the mosses, keeping it supple and vibrant for longer.
Incorporating Moss Wall Art Into Your Home Decor
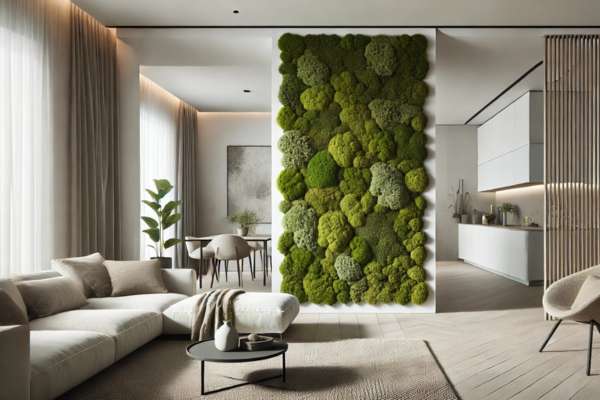
Moss wall art is versatile, fitting effortlessly into various decor styles. Its organic texture adds warmth to modern, minimalist spaces, while its earthy hues complement more rustic or eclectic interiors. For a contemporary home, consider using mosses art as a centerpiece, allowing the soft greens to provide contrast against clean, sharp lines. Whether it’s the focal point in a room or a subtle accent, wall arts enhances any environment with its serene, natural presence.
Eco-Friendly Benefits Of Moss Wall Art
Moss wall art isn’t just aesthetically fascinating—it’s an eco-conscious desire, too. Moss is a renewable resource, harvested sustainably to make certain minimum effect on the environment. Choosing preserved moss reduces the call for artificial materials, aligning with a greener life-style. Additionally, mosss acts as a herbal air cleaner, absorbing pollutants and enhancing indoor air best. By choosing mosses art, you’re now not simply adding splendor in your area however also making an environmentally accountable decision.
Where To Find Inspiration For Moss Wall Art
Inspiration is everywhere. Nature itself is the greatest muse—look to forests, gardens, or even a walk in the park for ideas on how to layer textures and colors. Online systems like Pinterest and Instagram are also splendid assets for innovative thoughts, providing a wealth of designs and techniques from around the world. Whether you draw from abstract art, architectural designs, or the natural world, let your creativity be guided by what inspires you most.
FAQ
How Do I Clean My mosses Wall Art?
Gently dust your mosses wall art with a soft brush or compressed air. Avoid using water, as moisture can damage the preserved moss and cause it to lose its texture and color.
Conclusion
Creating moss wall art is a completely unique and beautiful manner to deliver nature interior. By selecting the proper mosses sorts and arranging them creatively, you could design a lovely, low-renovation artwork piece that complements any space. With only a few substances and some considerate planning, you’ll learn how to make mosses wall artwork that displays your style and enhances your indoors design. Whether used as a focal point or a subtle accent, mosses wall art offers a natural, calming aesthetic. It’s an inexperienced preference that calls for no watering or maintenance, making it best for folks that need a touch of greenery without the problem.